
Multi-User Feature Guide
1. Introduction
The Multi-User feature allows CoinPayments business account users to securely grant limited access to their organization.
This enables businesses to collaborate efficiently while maintaining strict control over sensitive financial data.
Typical use cases include:
- Operational efficiency: Give colleagues the tools they need without giving full account control.
- Seamless accounting: Allow accountants to log in, view, and export transaction data themselves.
- Sales enablement: Allow sales staff to issue invoices and track payment status without exposing wallets or balances.
2. How It Works
Account Owners can invite users to their organization and assign them a role with specific permissions.
Invited users log in using their own CoinPayments account and access the organization using the Profile Switcher located in the top-right corner of the dashboard.
Supported Roles
- Account Owner: Full administrative control over the organization.
- Viewer: Read-only access to wallets and transactions.
- Sales: Invoice-only access. Sales users can create invoices and monitor payment status but cannot view confidential account data such as wallets or balances.
Roles & Permissions
| Feature | Account Owner | Viewer | Sales |
|---|---|---|---|
| View Wallets | ✅ | ✅ | ❌ |
| View Transaction Data | ✅ | ✅ | ☑️ ** |
| Export Transaction Data | ✅ | ✅ | ❌ |
| Initiate Transactions | ✅ | ❌ | ❌ |
| Issue Invoices | ✅ | ❌ | ✅ |
| View Invoice Payment Status | ✅ | ✅ | ✅ |
| View Payment Settings | ✅ | ✅ | ❌ |
| Edit Payment Settings | ✅ | ❌ | ❌ |
| View Integrations & Webhooks | ✅ | ✅ | ❌ |
| Manage Integrations & Webhooks | ✅ | ❌ | ❌ |
| Invite Users | ✅ | ❌ | ❌ |
| Manage Business Profile | ✅ | ❌ | ❌ |
| Change Organization Email & Password | ✅ | ❌ | ❌ |
| Delete an Organization | ✅ | ❌ | ❌ |
☑️ = Sales users can only view invoice-related transaction data. They cannot view other transaction types such as sends/withdrawals, received/deposits, or conversions.
Example: Viewer
An accountant is invited as a Viewer of an organization's profile. After they successfully login or sign up for a new account, they will immediately be able to view and export transaction reports.
For more details on available Viewer capabilities, see Viewer Role.
Example: Sales User
An employee of an organization is invited as a Sales user. After they successfully login or sign up for a new account, they will immediately be able to issue invoices on behalf of your organization, as well as track the statuses of invoices.
For more details on available Sales capabilities, see Sales Role.
3. Account Owner Role
Adding a New User
-
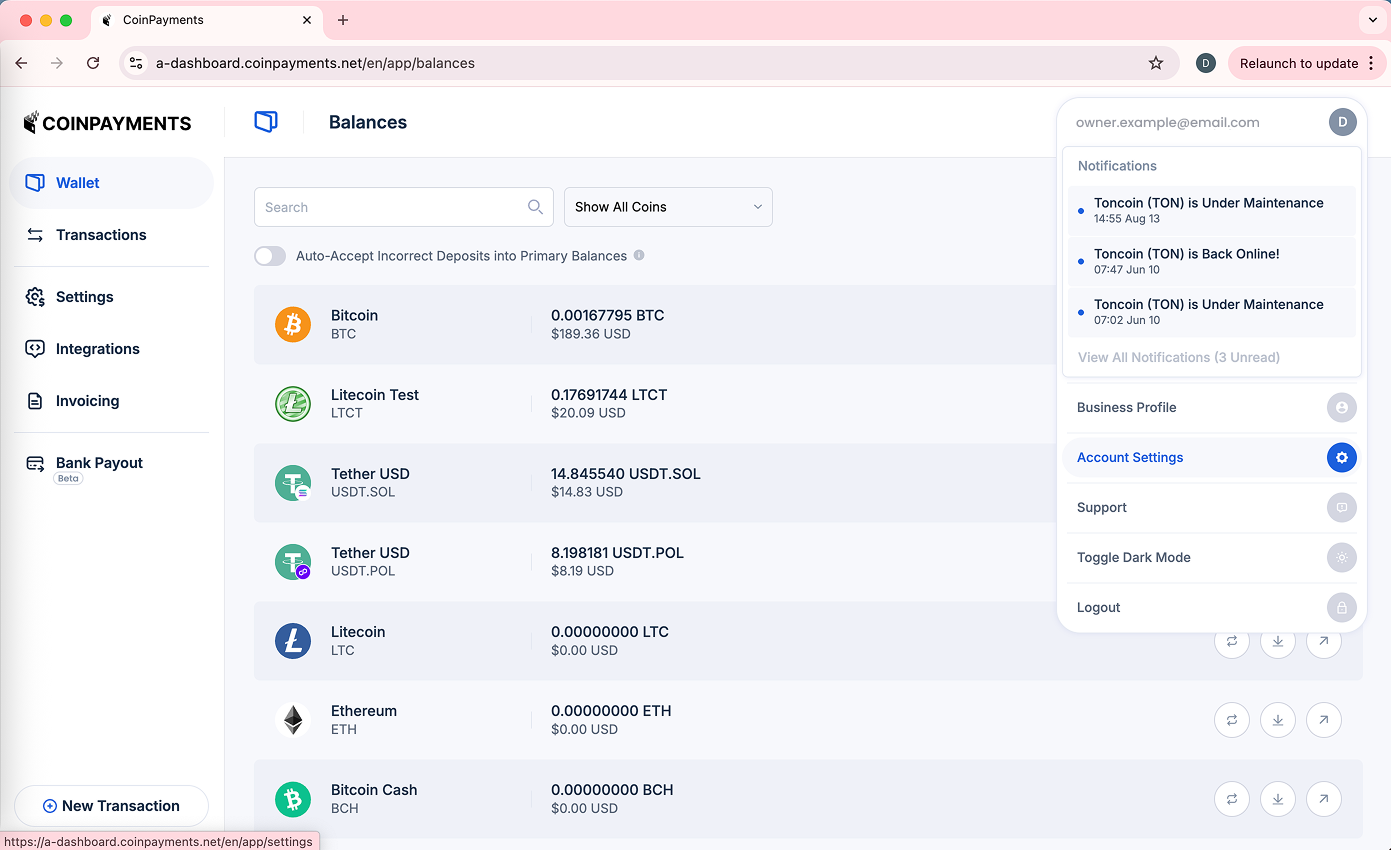
Go to Account Settings (by clicking the Profile Switcher on the top-right and selecting Account Settings)
-
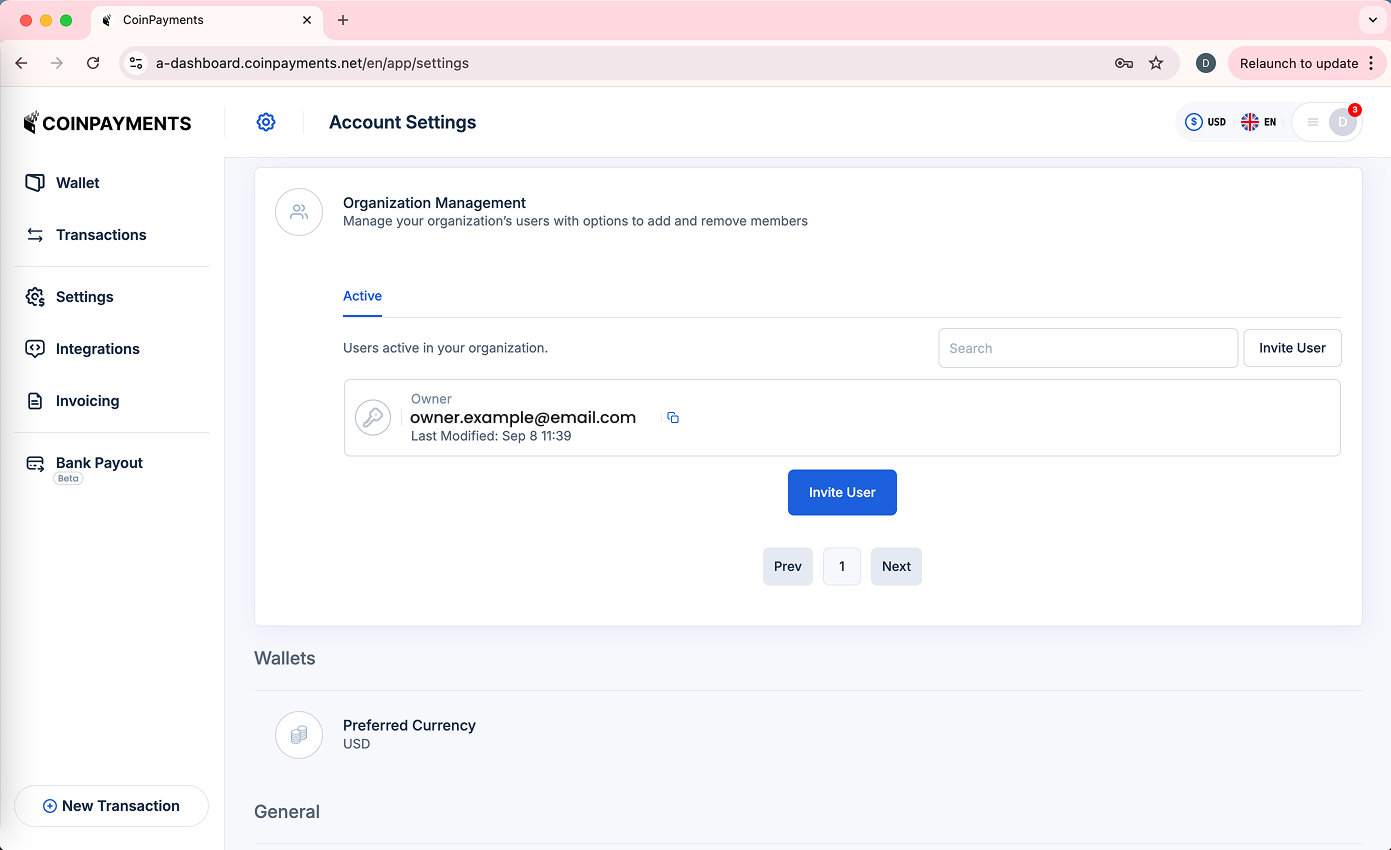
Select the Organization Management option to expand it.
-
From the Active tab, click Invite User.
-
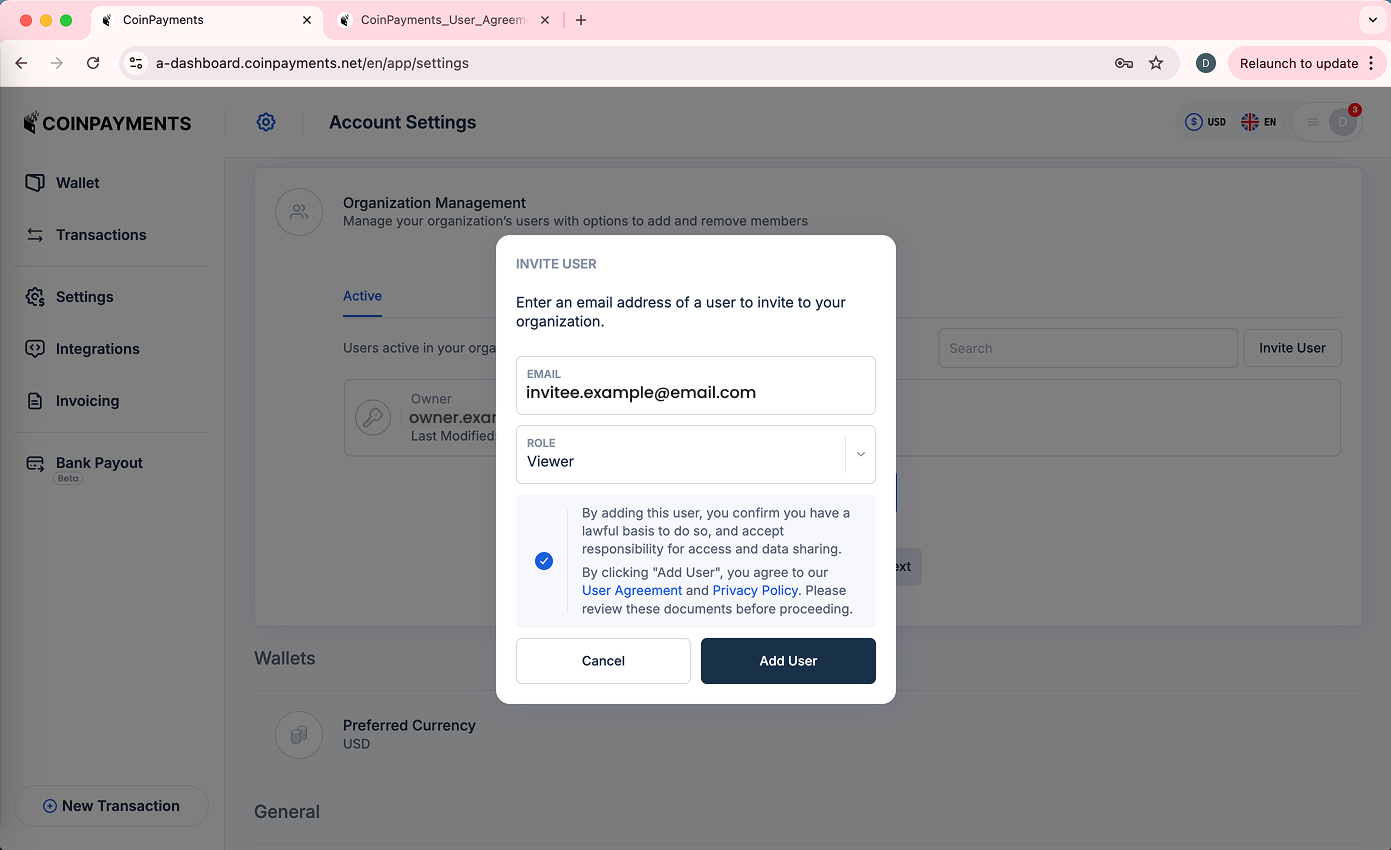
Enter the email address of the person you wish to invite, click to accept the Terms and Conditions, then click Add User.
-
An email is sent requesting them to login/sign up after you complete your two-factor authentication.
Deactivating a User
-
Go to Account Settings (by clicking the Profile Switcher on the top-right and selecting Account Settings)
-
Select the Organization Management option to expand it.
-
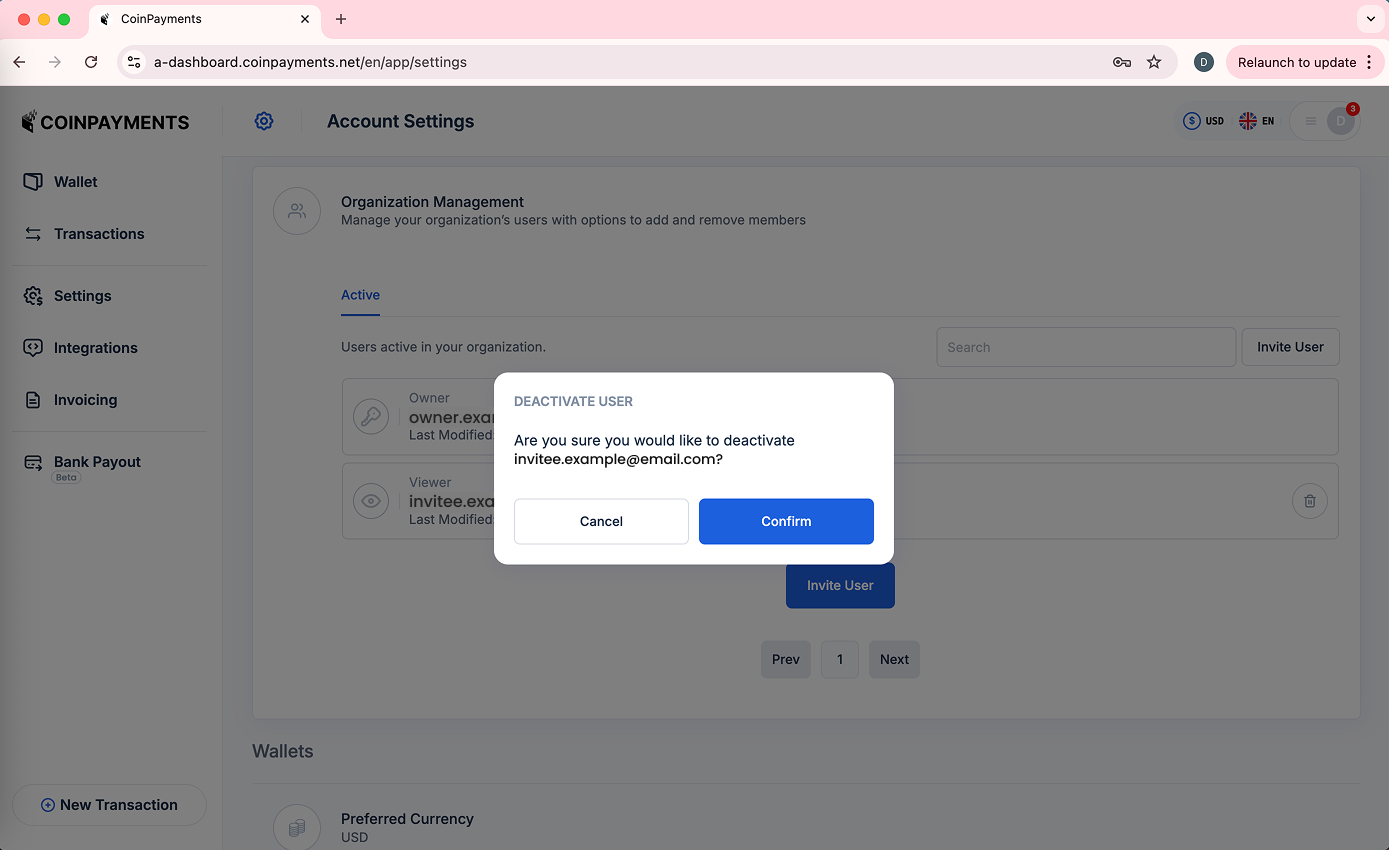
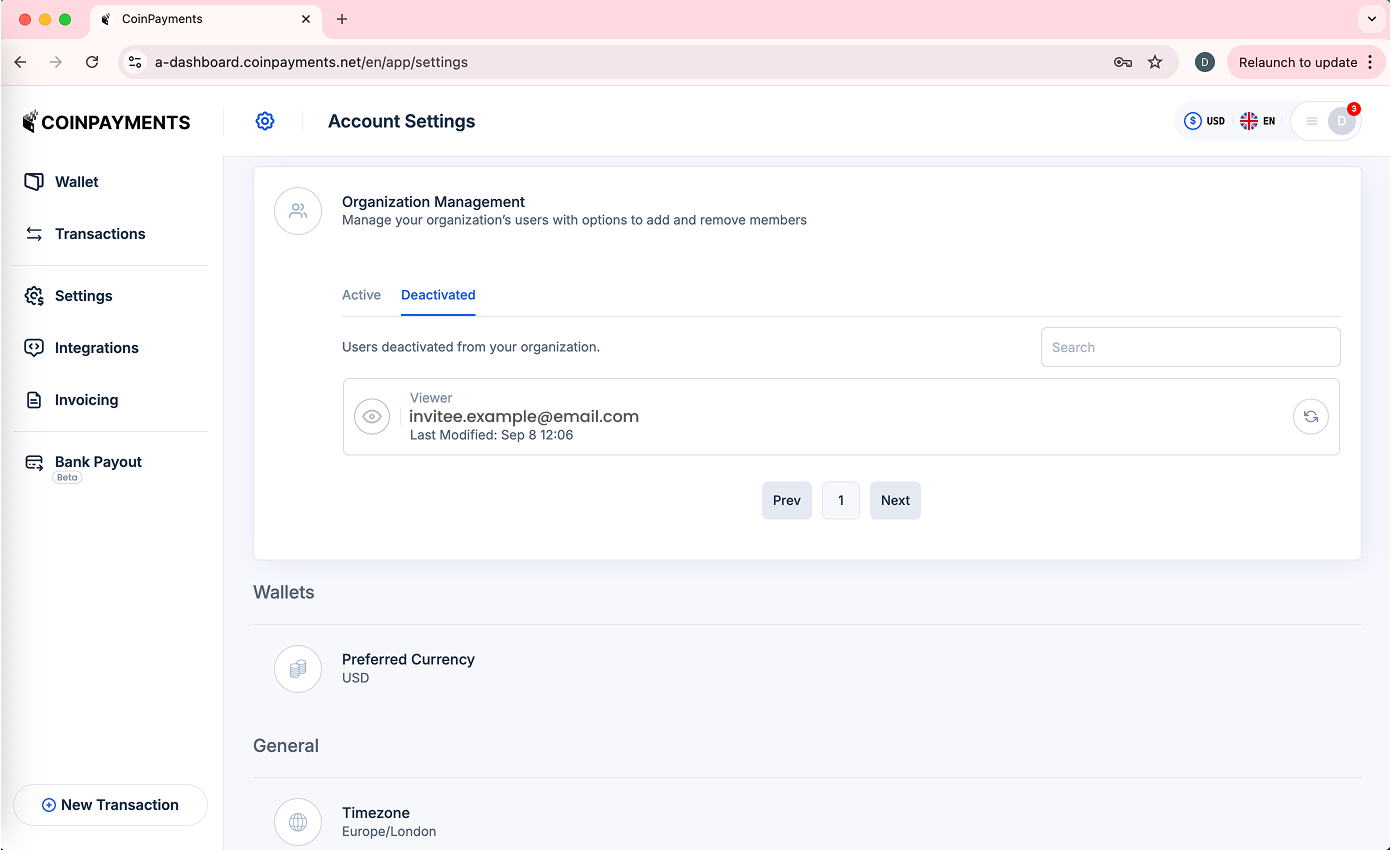
Find the account you wish to deactivate on the Active tab, and click the Deactivate button.
-
The user is deactivated after you complete your two-factor authentication, and they will appear on the deactivated user list.
Reactivating a User
-
Go to Account Settings (by clicking the Profile Switcher on the top-right and selecting Account Settings)
-
Select the Organization Management option to expand it.
-
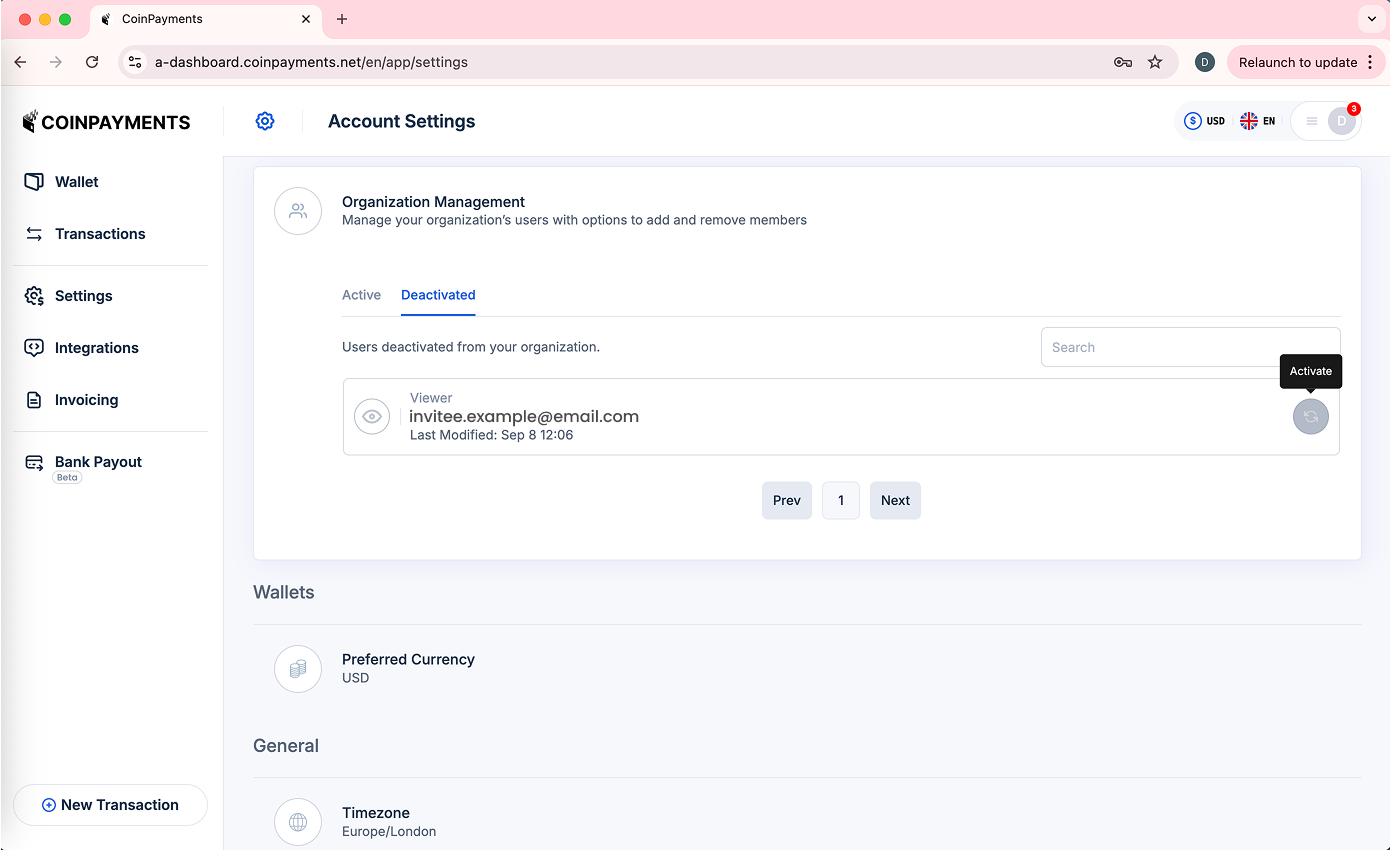
Highlight the Deactivated list and find the user you wish to reactivate.
-
Click the Activate button on their account.
-
The user is reactivated after you complete your two-factor authentication, and they will reappear on the active user list.
4. Signing In After Being Invited
When you receive an invitation to join an organization as a Viewer or a Sales user, your next steps depend on whether or not your email already has an associated CoinPayments account.
Sign Up (If You Don't Have a CoinPayments Account Yet)
- Go to the CoinPayments signup page.
- Create a CoinPayments account using the same email address that received the invitation.
- During signup:
- Individuals: Select your country of residence.
- Businesses: Select your country of incorporation.
- This determines which CoinPayments entity your account belongs to.
⚠️ Important:
- Your jurisdiction must be supported by CoinPayments (see our list of restricted jurisdictions here
- You must sign up under the same entity as the inviting organization.
Jurisdiction Repercussions
CoinPayments accounts are separated into multiple entities for regulatory compliance. This can be identified by the prefix used in the dashboard URL:
| Entity Name | Covers |
|---|---|
a-dashboard.coinpayments.net | Businesses and individuals outside the European Economic Area (EEA) and the USA |
b-dashboard.coinpayments.net | Businesses and individuals located in the EEA |
c-dashboard.coinpayments.net | Businesses and individuals in the USA |
⚠️ If your account is tied to a different entity than the inviting business, you will not be able to join their organization.
Common Scenarios
| Scenario | Owner Location | Invitee Location | Result | Action Required |
|---|---|---|---|---|
| 1 | EEA-based business | EEA-based business/individual | ✅ Allowed | No action needed |
| 2 | EEA-based business | Non-EEA business/individual | ❌ Denied | Must re-register with a new email |
| 3 | Non-EEA business | Non-EEA business/individual | ✅ Allowed | No action needed |
| 4 | Non-EEA business | EEA-based business/individual | ❌ Denied | Must re-register with a new email |
| 5 | USA-based business | USA-based business/individual | ✅ Allowed | No action needed |
| 6 | Non-USA-based business | Non-USA-based business/individual | ❌ Denied | Must re-register with a new email |
How to Fix Access Issues
If you're blocked because of entity mismatch:
- Sign up using a new email address via the CoinPayments signup page.
- Select the correct country during signup.
- Send the new email address to the organization and ask them to update your invite.
Logging in (Existing Users)
- Log in normally on the CoinPayments login page.
- Use the Profile Switcher (top-right of the dashboard) to switch from your own account to the organization that invited you.
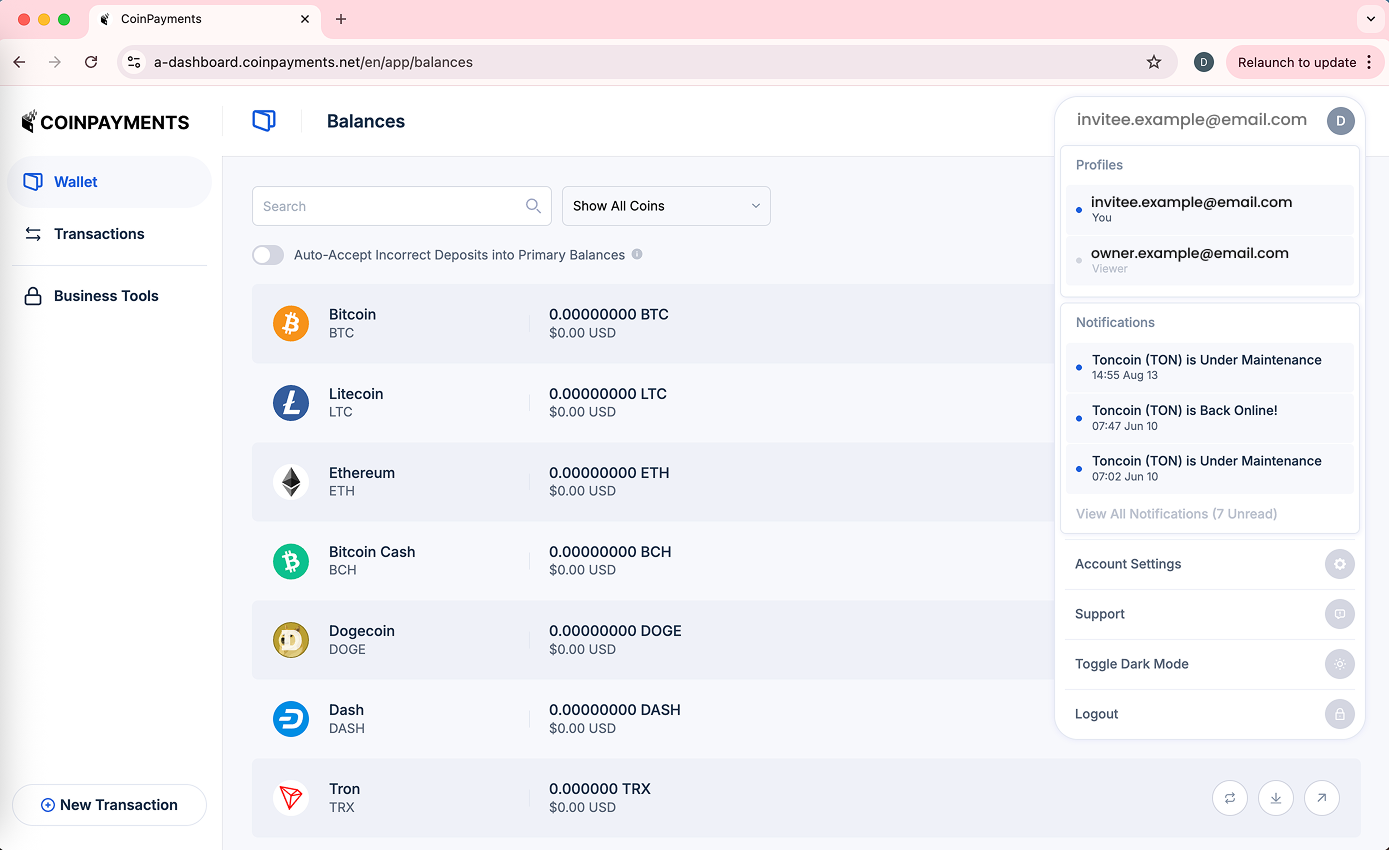
✅ Once switched to the organization, a banner will confirm that you are viewing the organization with Viewer or Sales permissions.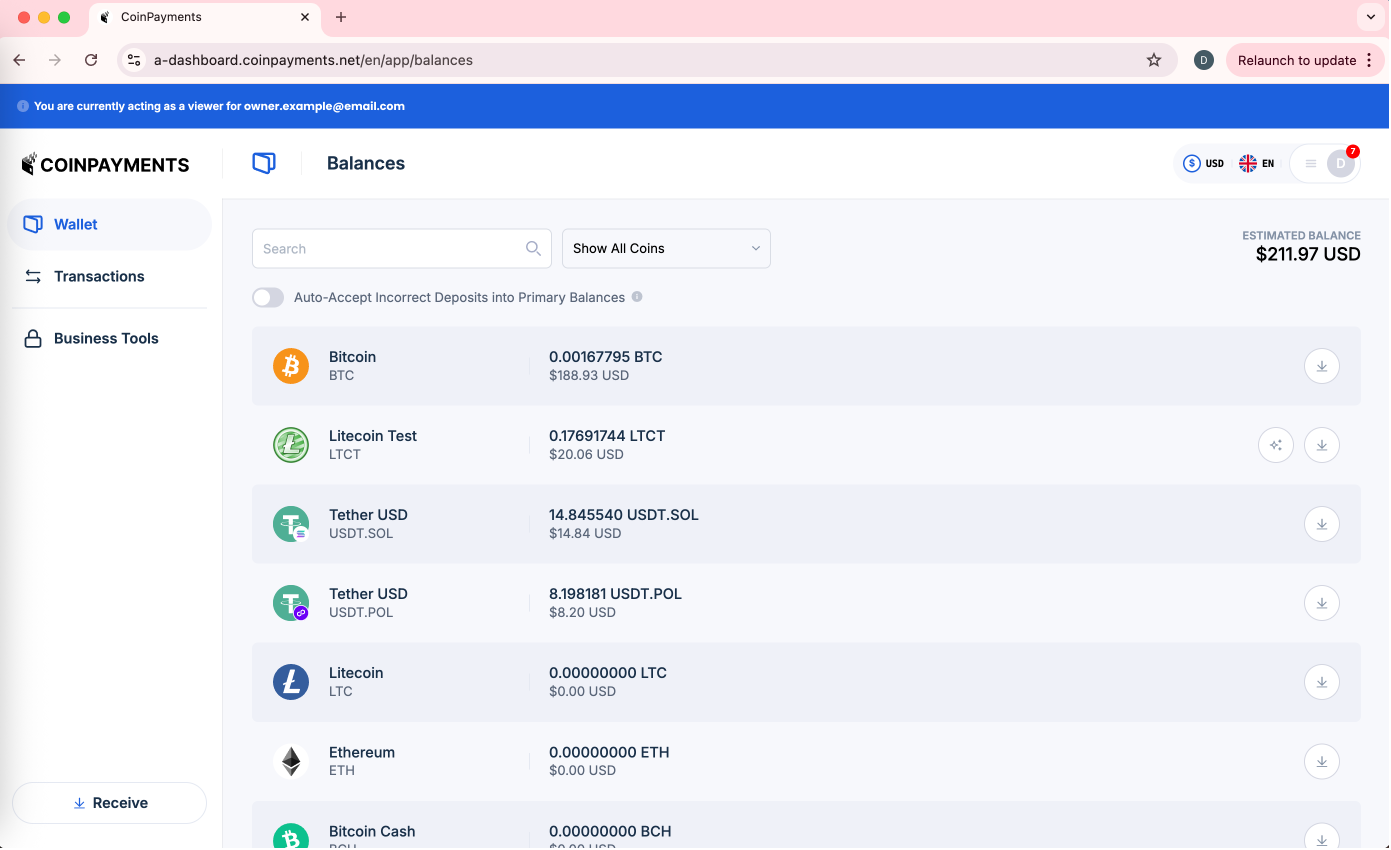
5. Accepting an Invitation
The onboarding flow for Viewers and Sales users can be found here, detailing the steps to follow dependent on whether or not the invited email has an associated CoinPayments account.
6. Viewer Role
The Viewer role is designed for individuals who need visibility into funds, wallets, transaction history, or integrations but do not have permission to manage integrations or payments.
Available Capabilities
Once logged in and switched to the organization profile, Viewers can:
- View wallet balances, addresses, and recent transactions per currency from the Wallet tab
- View the organization's auto-sweep configurations (refer to the Auto-Sweep section of the Integration Guide for how these are configured by the Account Owner)
- View and filter transactions (refer to the Transaction History section of the Integration Guide)
- Export transaction data (refer to the Export Transaction History section of the Integration Guide)
- Monitor invoice statuses (see below)
- View the organization's configured payment settings (refer to the Payment Settings section of the Integration Guide for how these are configured by the Account Owner)
- View the organization's configured integrations and webhook endpoints (refer to the Webhook History section of the Integration Guide for how these are configured by the Account Owner)
What Viewers Cannot Do
Viewers do not have permission to:
- Initiate transactions (send, convert, or withdraw)
- Edit payment settings or manage integrations
- Issue or manage invoices
- Invite or manage users
- Modify the organization's business profile
7. Sales Role
The Sales role is designed for collaborators who handle payment requests, with no access to confidential account data like balances or payout settings. Sales users have visibility over all invoices issued by the organization, not just the ones they created themselves.
Available Capabilities
Once logged in and switched to the organization profile, Sales users can:
- Issue invoices on behalf of the organization (refer to the Invoicing section of the Integration Guide)
- Monitor the statuses of all organization invoices (see below)
- Manage existing organization invoices (see below)
Note: Sales users can only see invoice-related transaction data in the Transactions tab. Other transaction types (sends/withdrawals, received/deposits, conversions) are not visible.
Invoice Statuses
Sales users can monitor the statuses of all invoices issued by the organization from the Transactions tab: 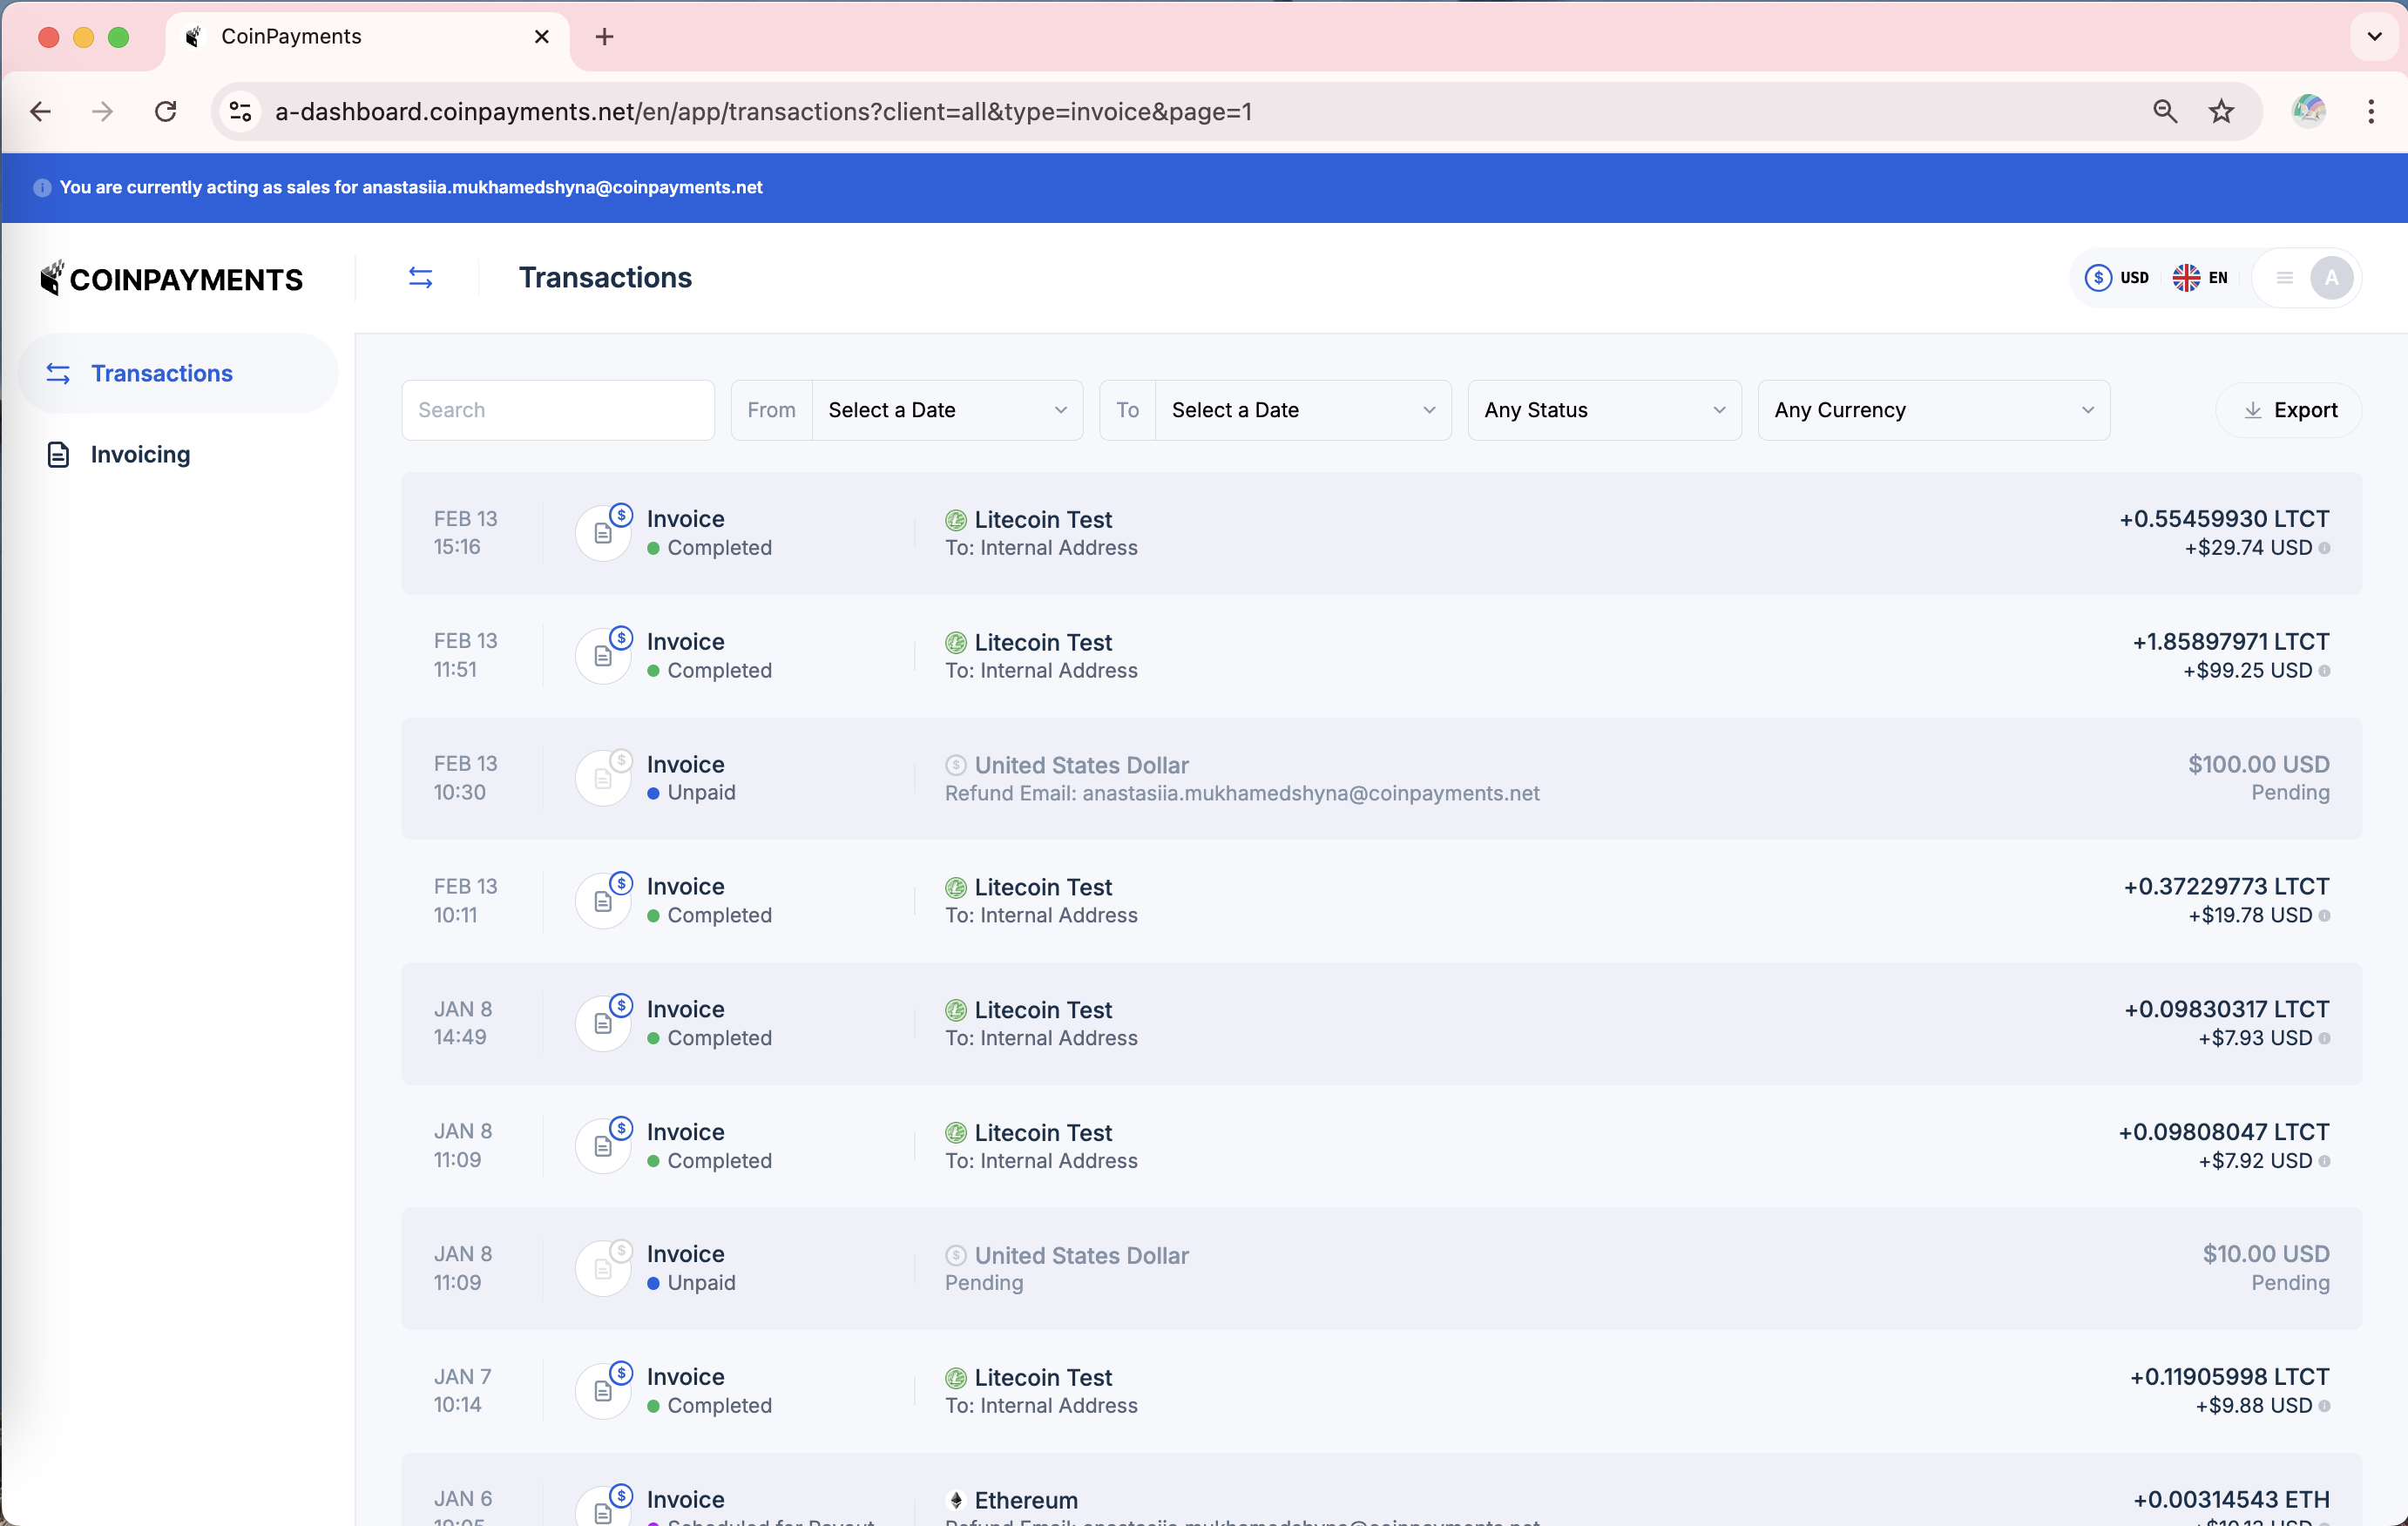
| Status | Description |
|---|---|
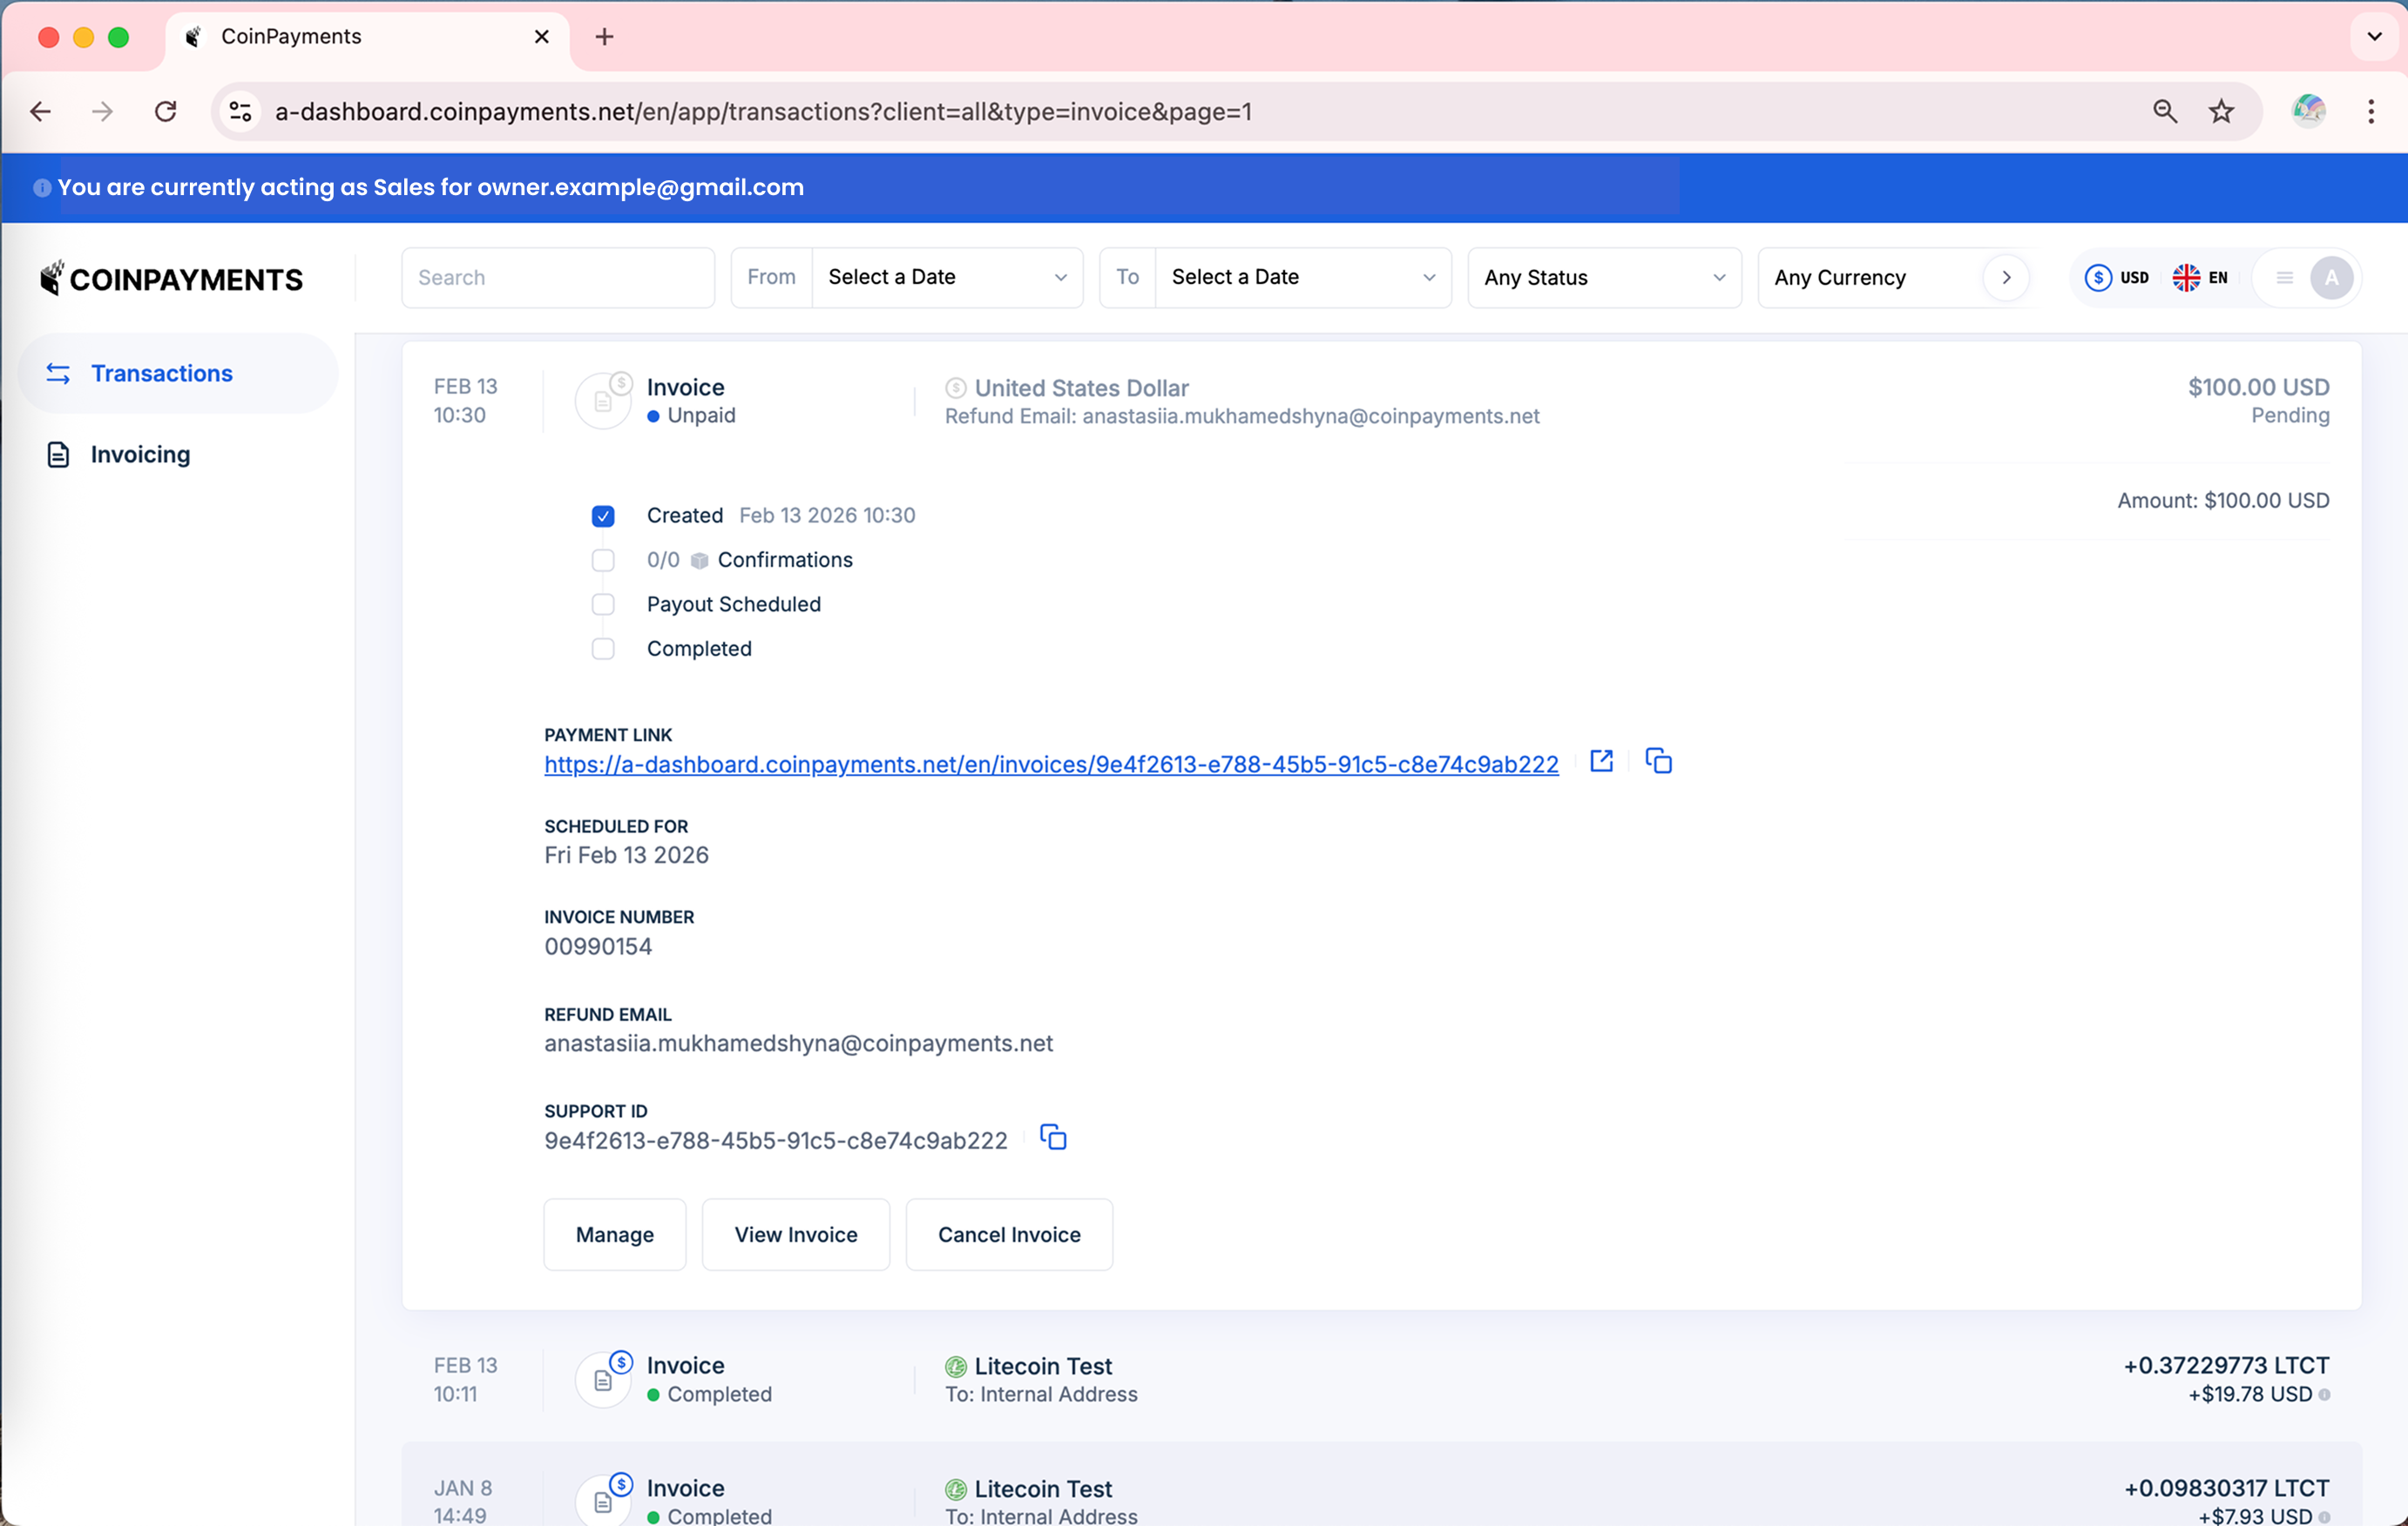
| Unpaid | The invoice has been issued but no payment has been received yet. |
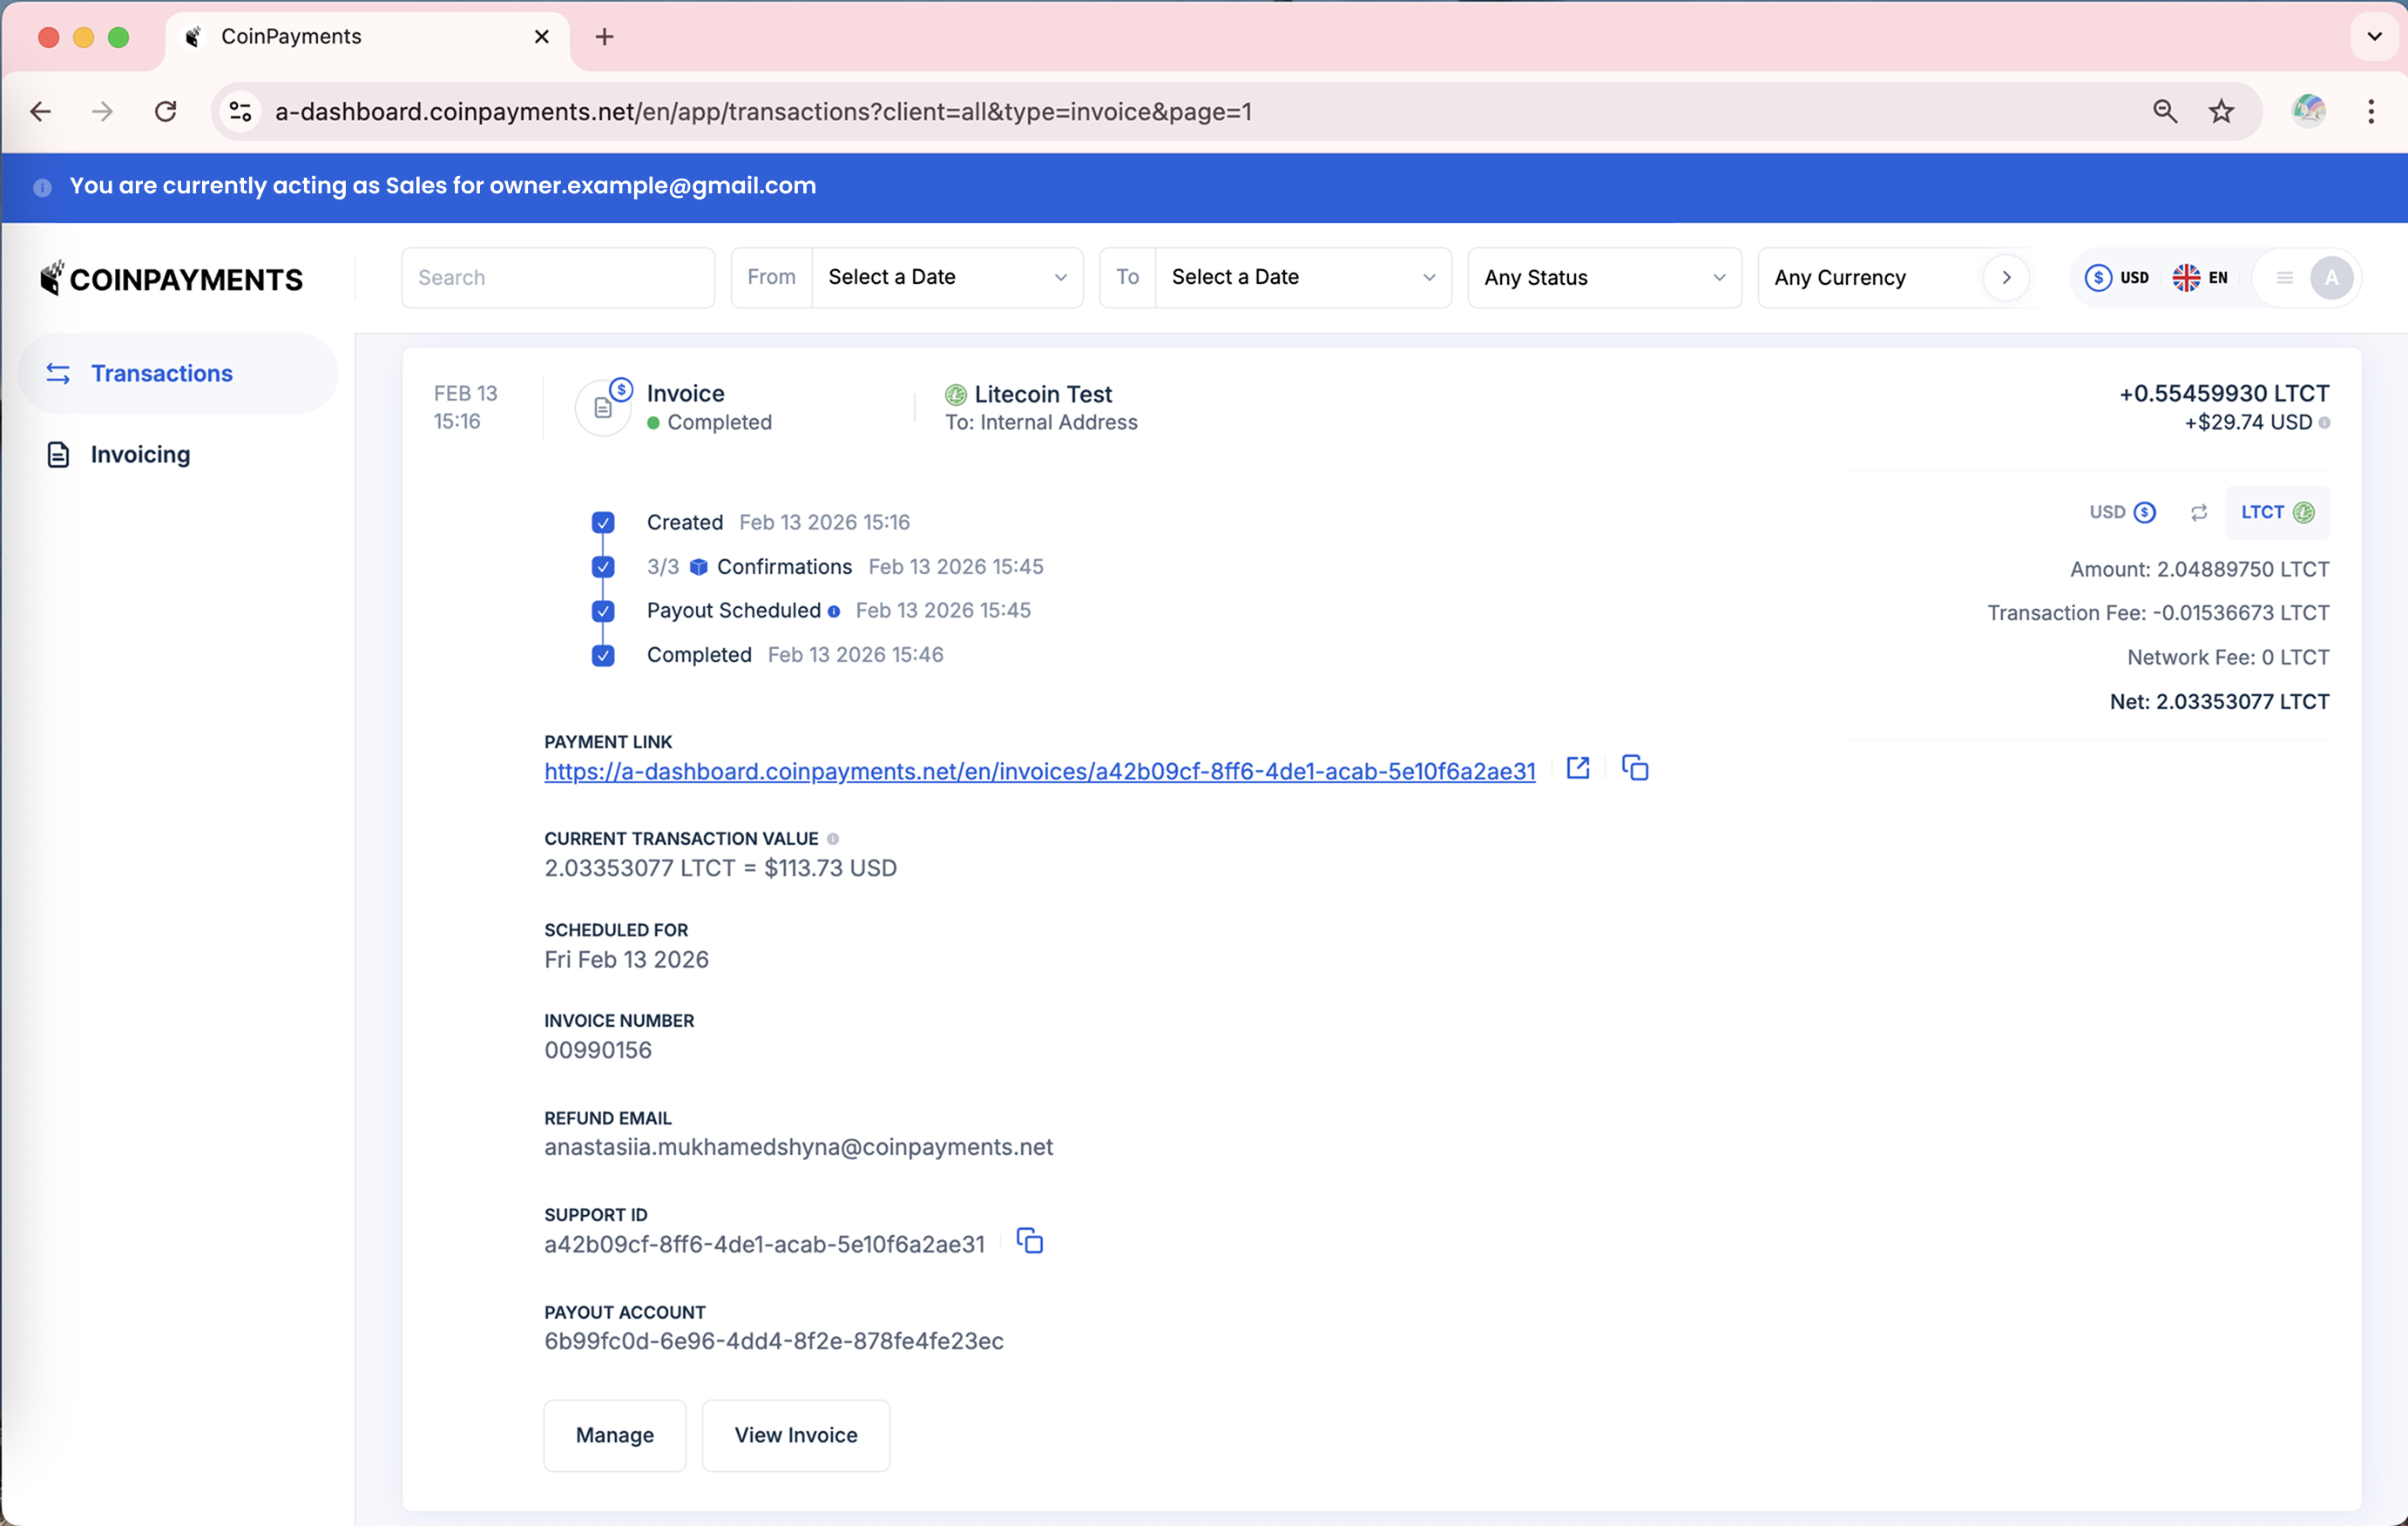
| Paid / Completed | The invoice has been fully paid and the required number of blockchain confirmations have been received. |
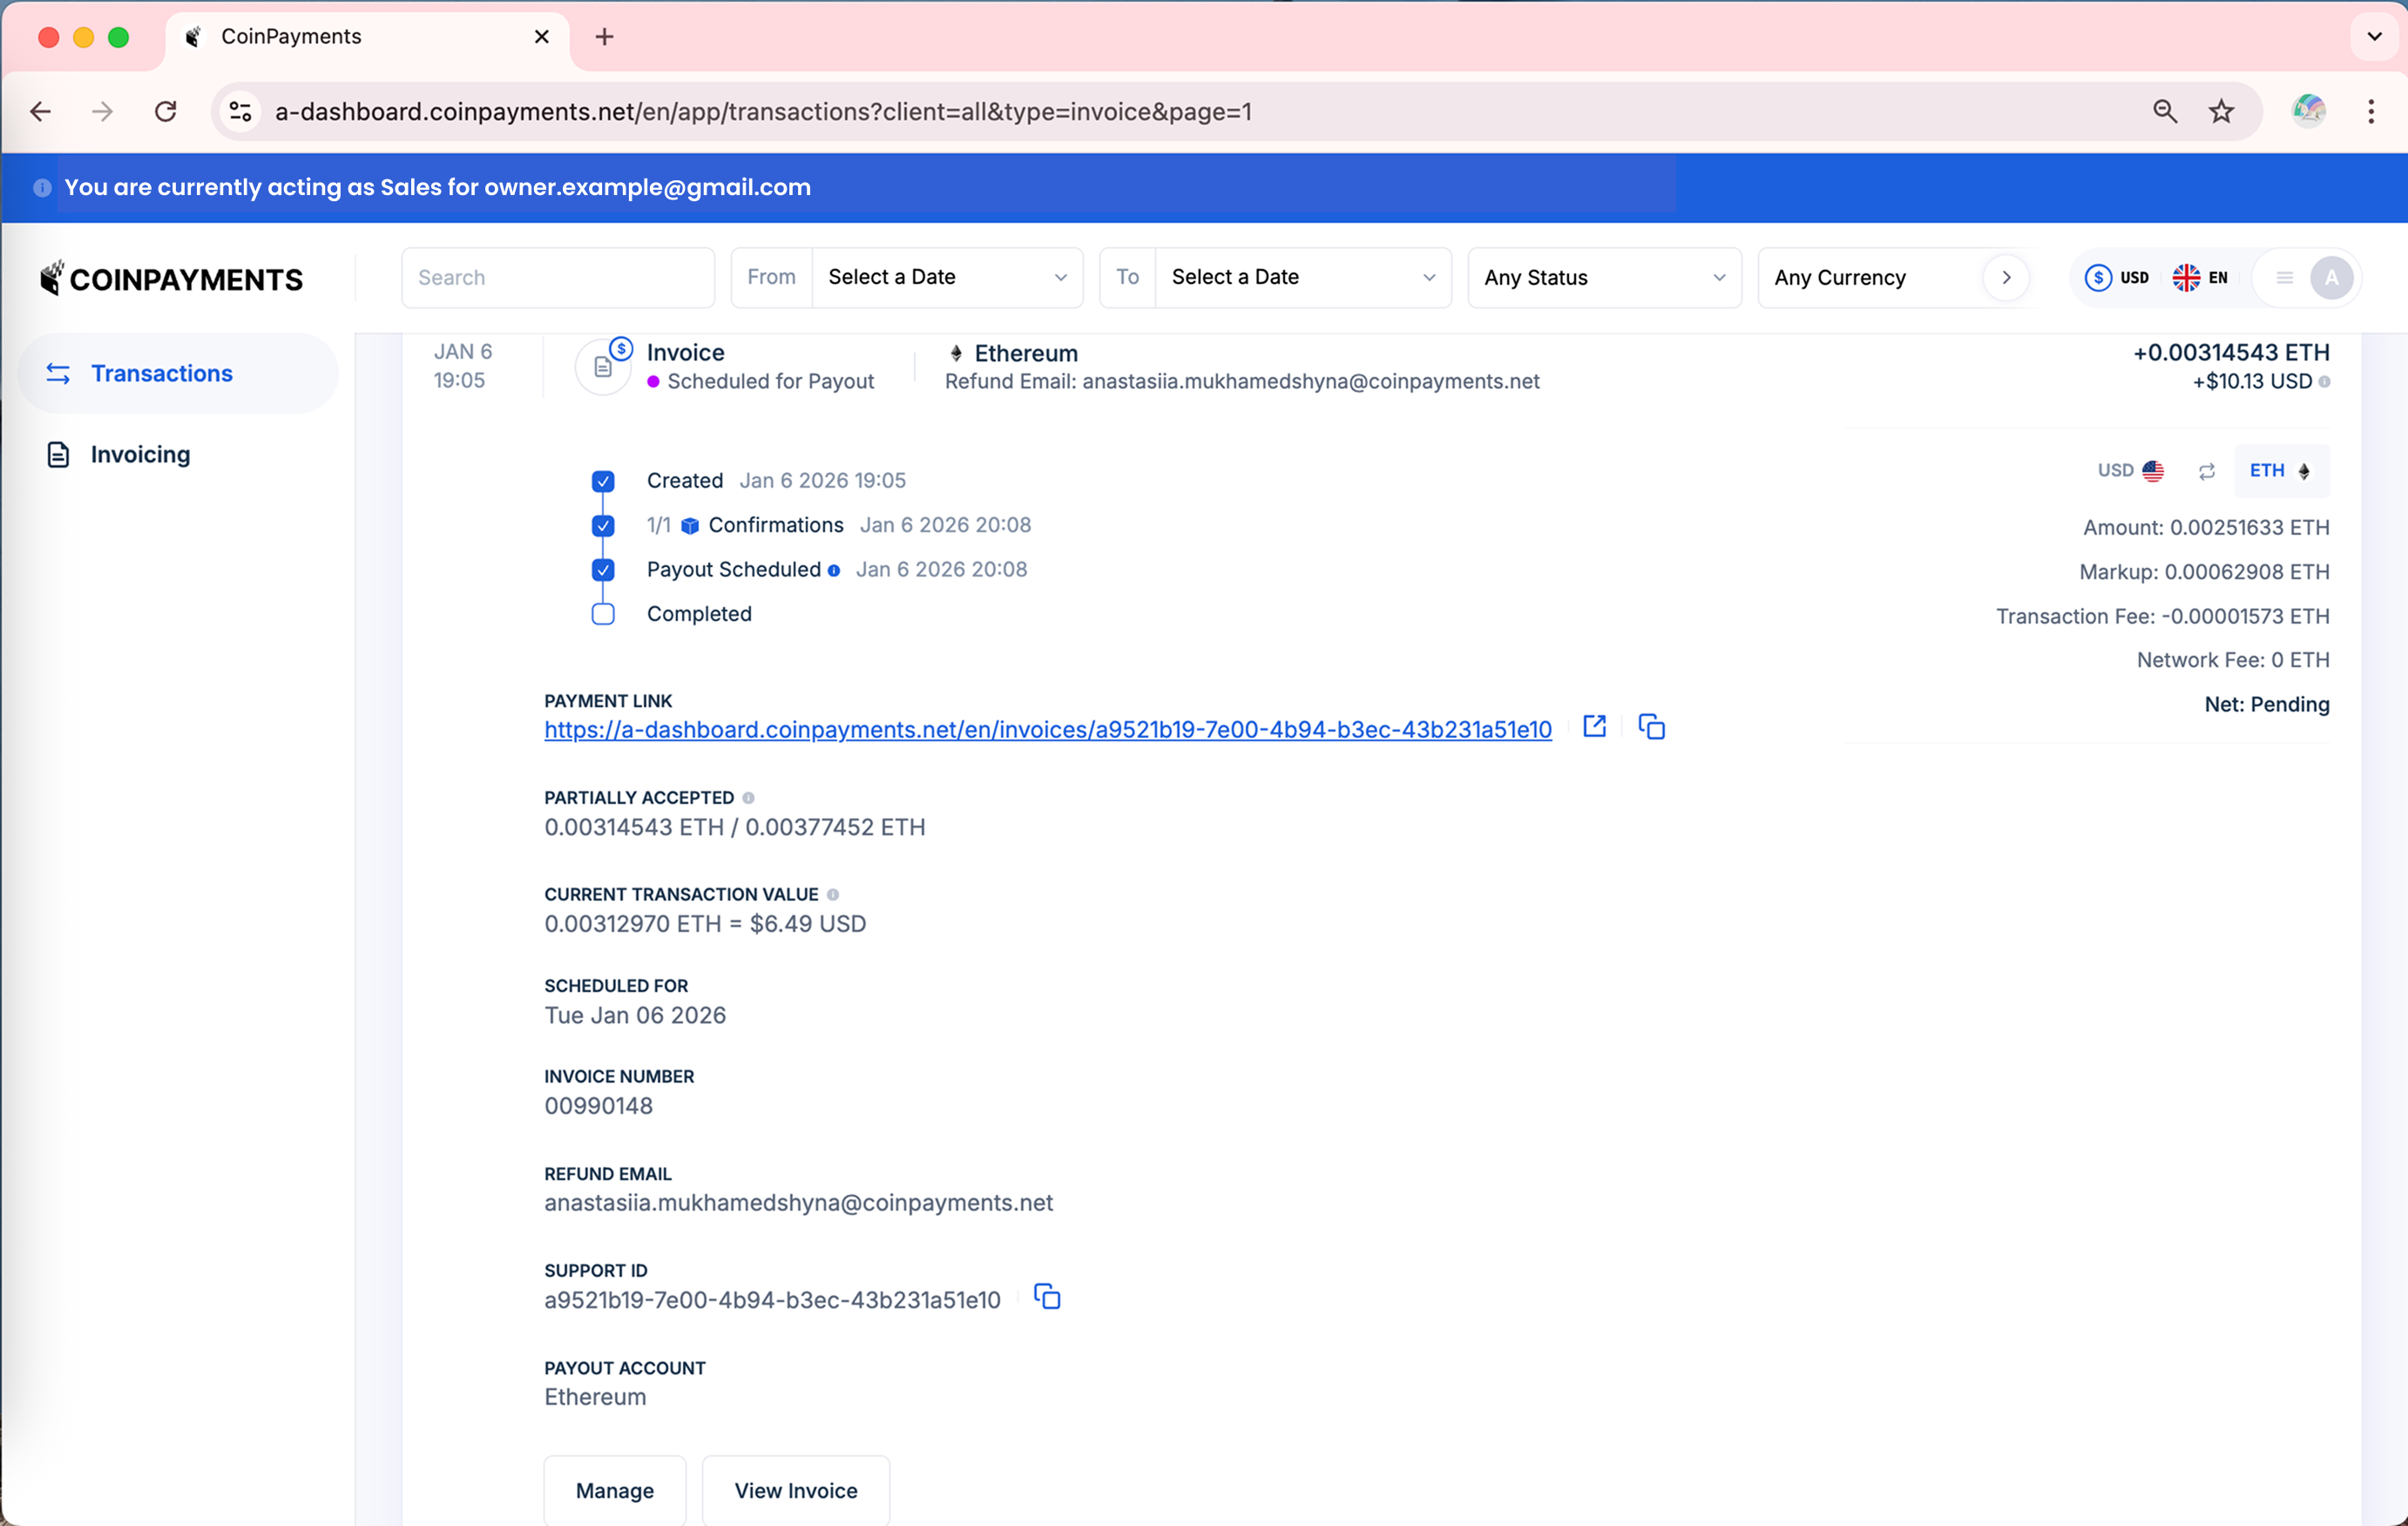
| Scheduled Payout | Payment has been received and is scheduled for payout to the organization's wallet. |
| Partially Confirmed | Payment has been detected on the blockchain and is accumulating confirmations (for example, 3/6 confirmations received). No action is required - the invoice will automatically move to Paid / Completed once the required number of confirmations has been reached. |
-
Paid/Completed
-
Unpaid
-
Scheduled Payout
Managing Existing Invoices
Sales users can manage invoices depending on their status:
-
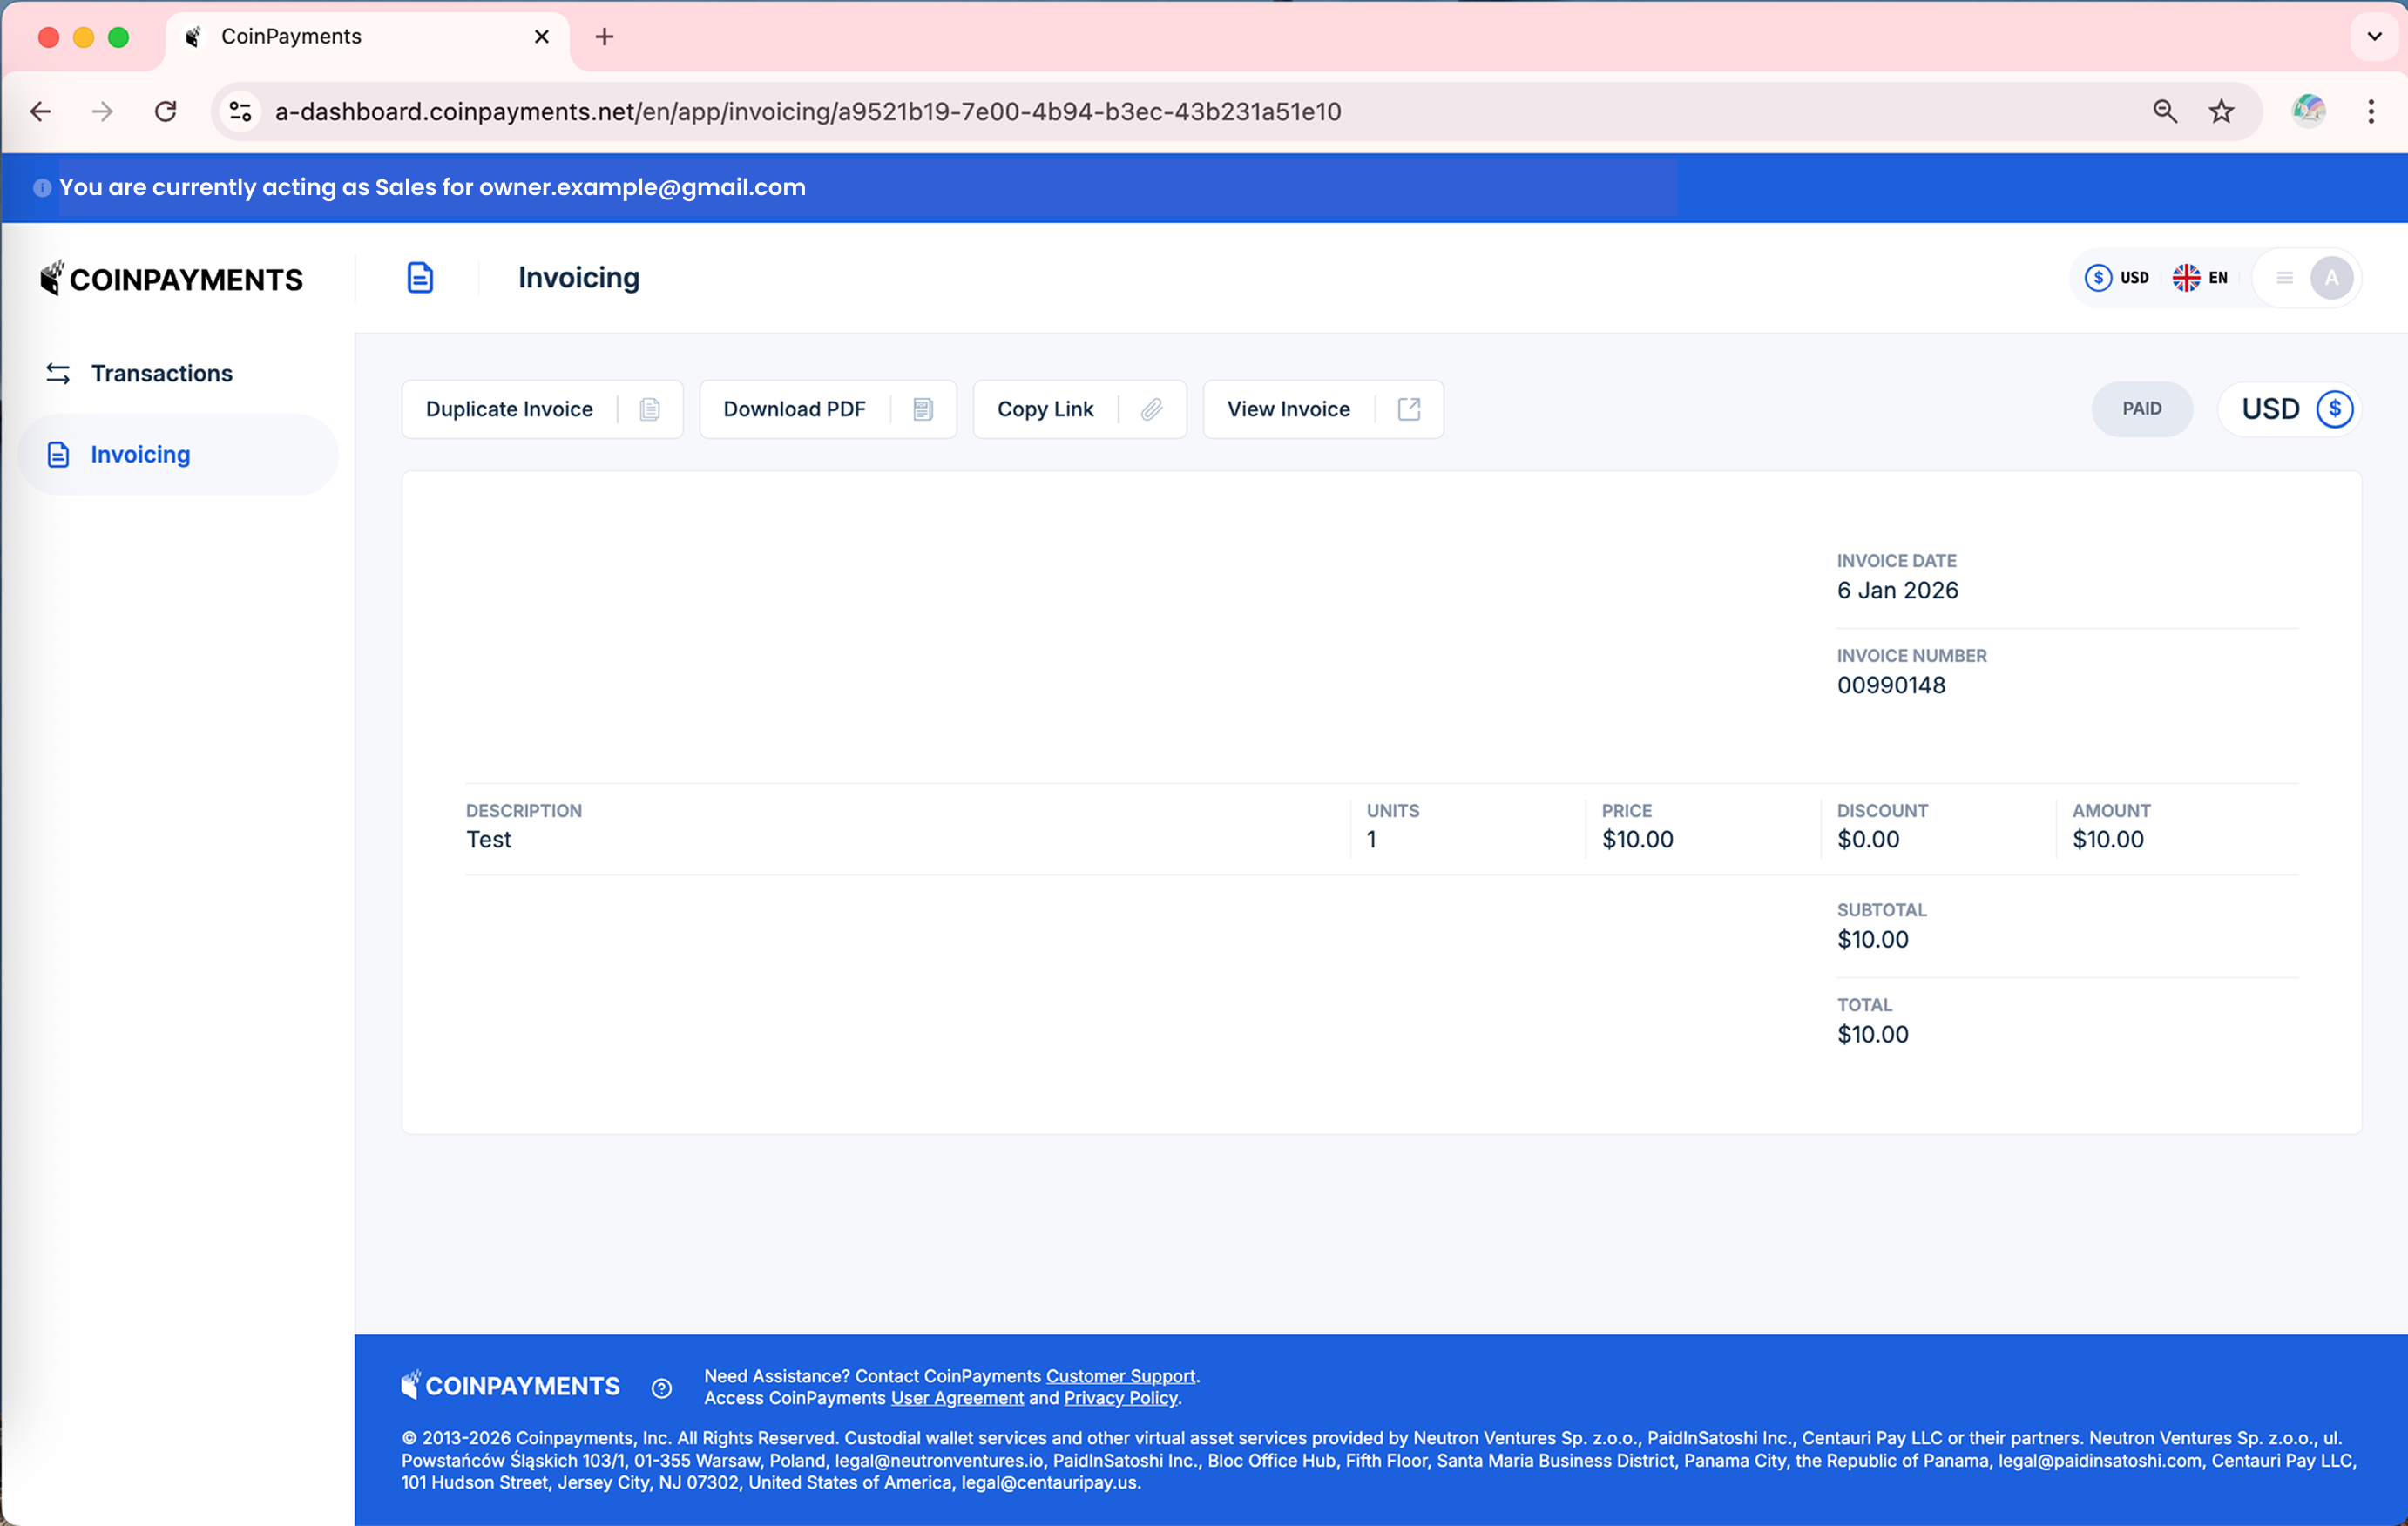
Paid/Completed invoices: Sales users can duplicate the invoice, download it, or copy its link for sharing.
-
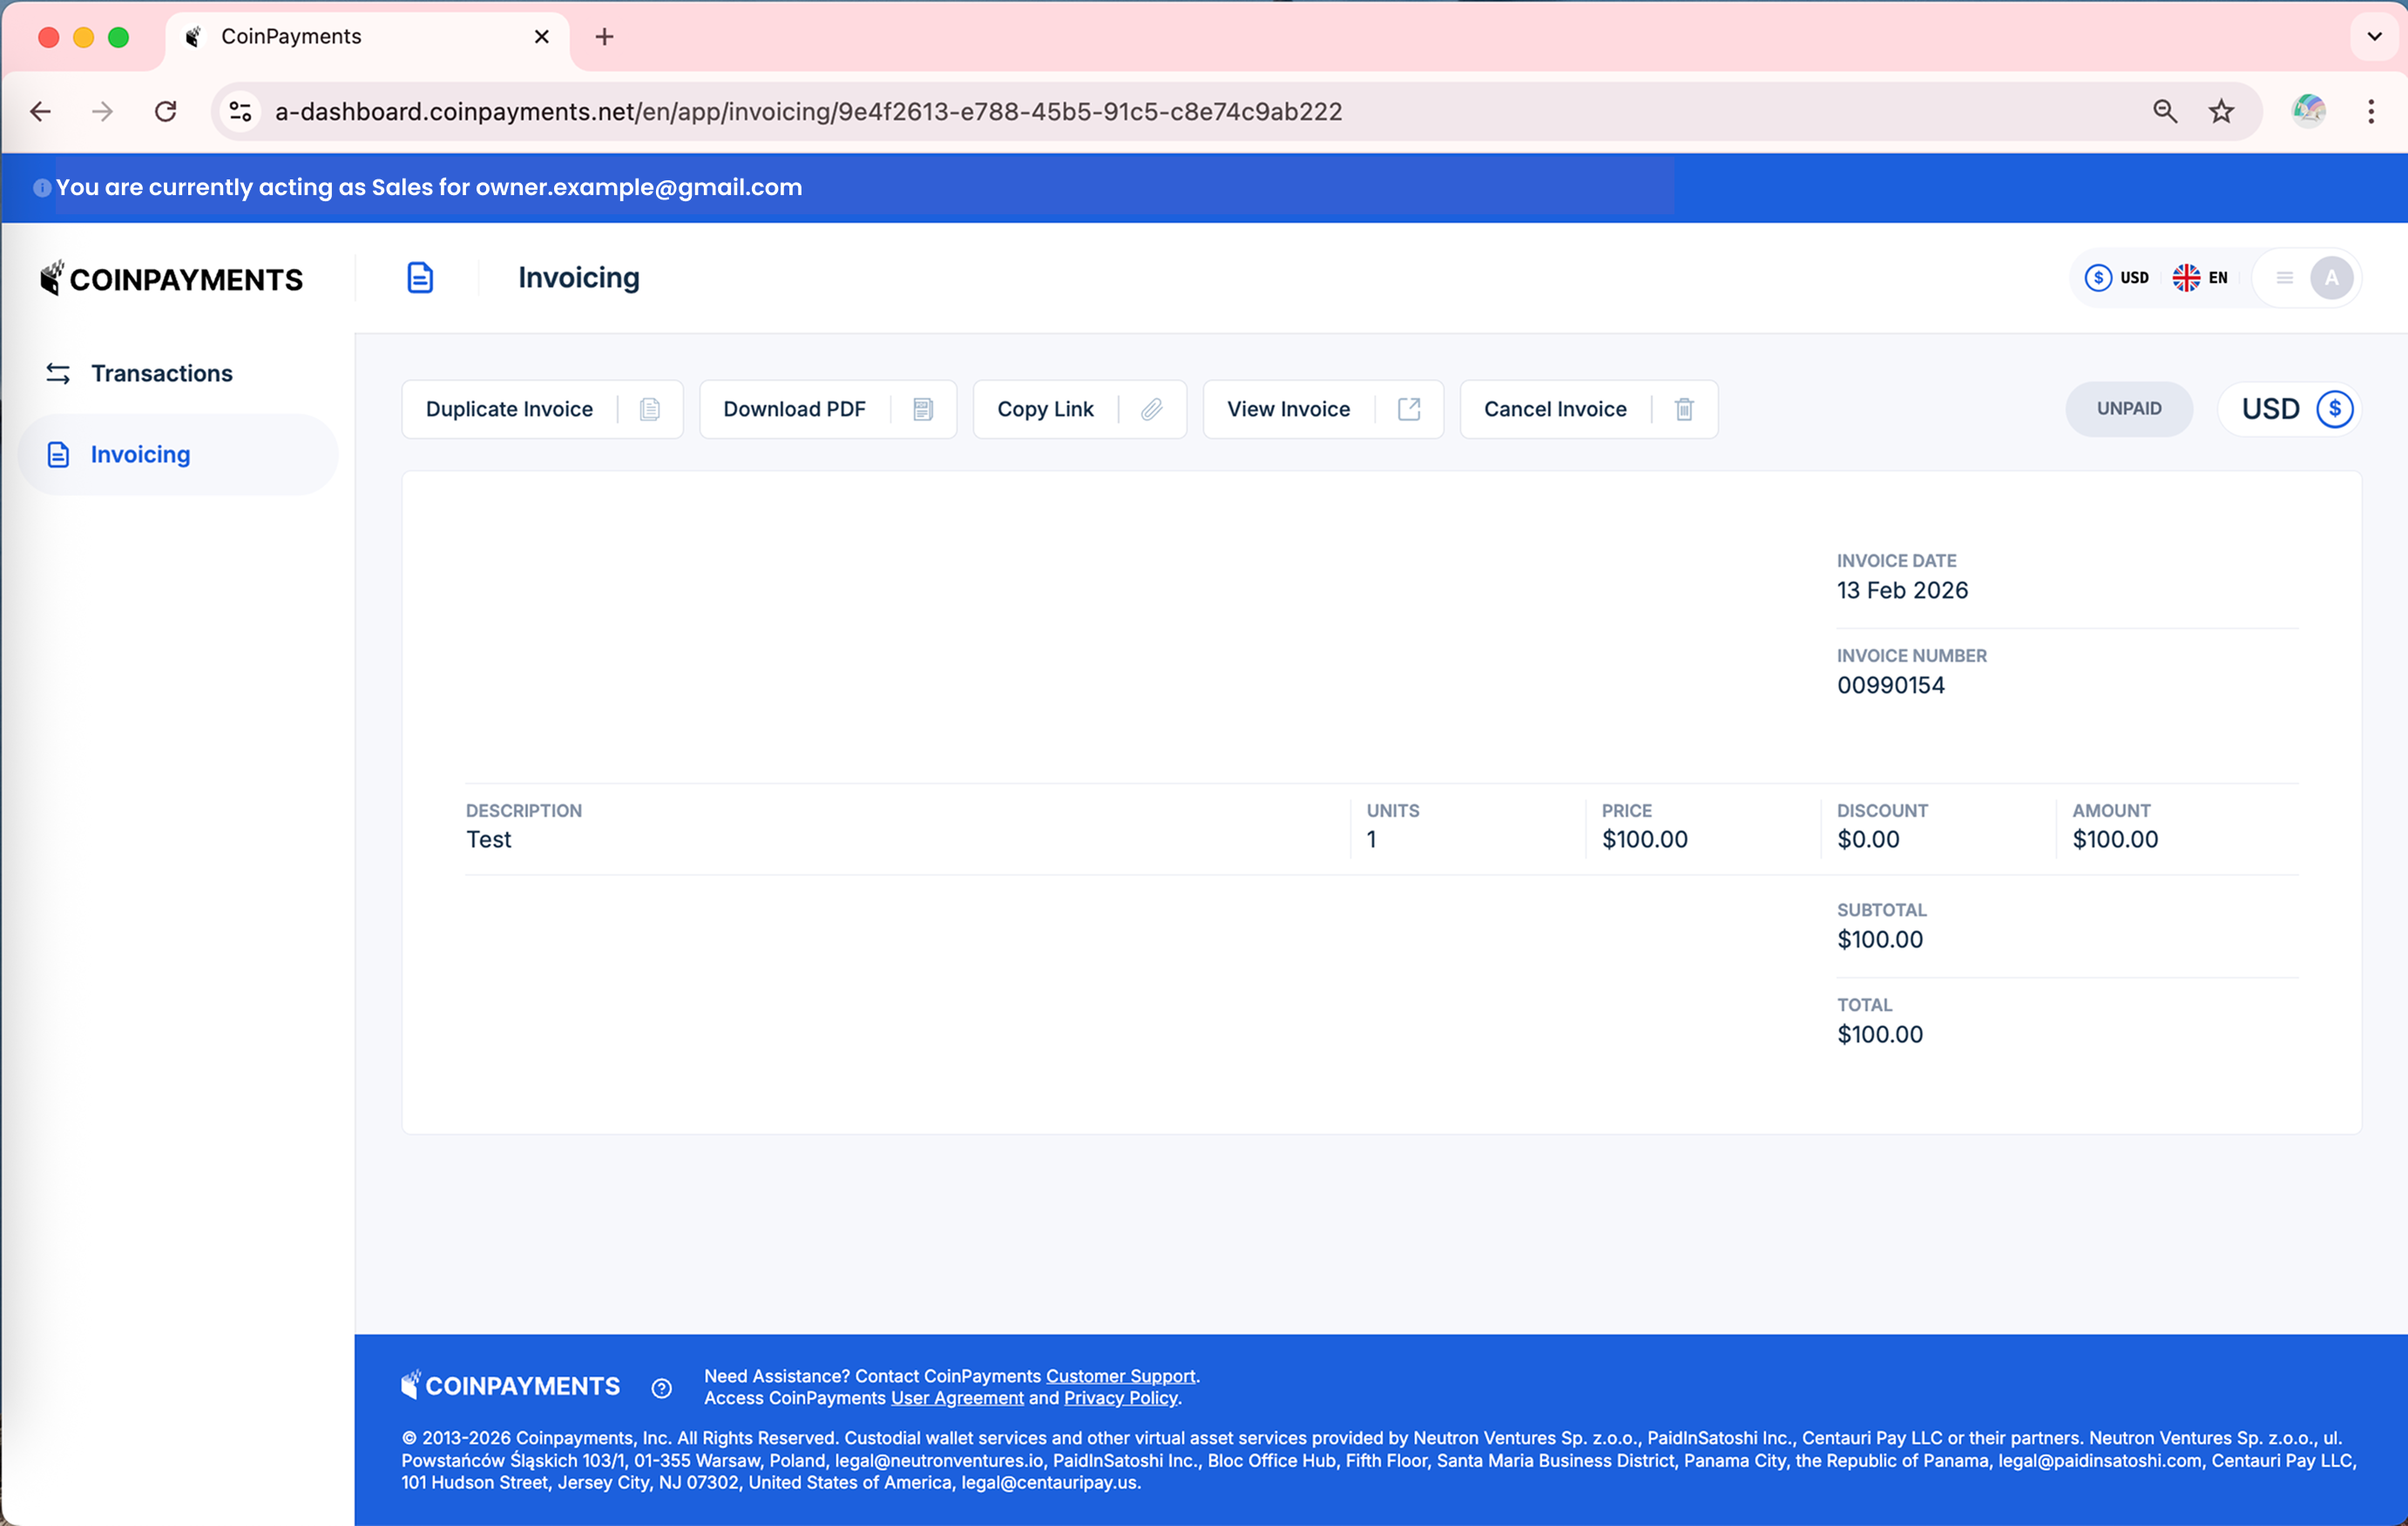
Unpaid invoices: Sales users can duplicate the invoice, download it, copy its link for sharing, or cancel it.
-
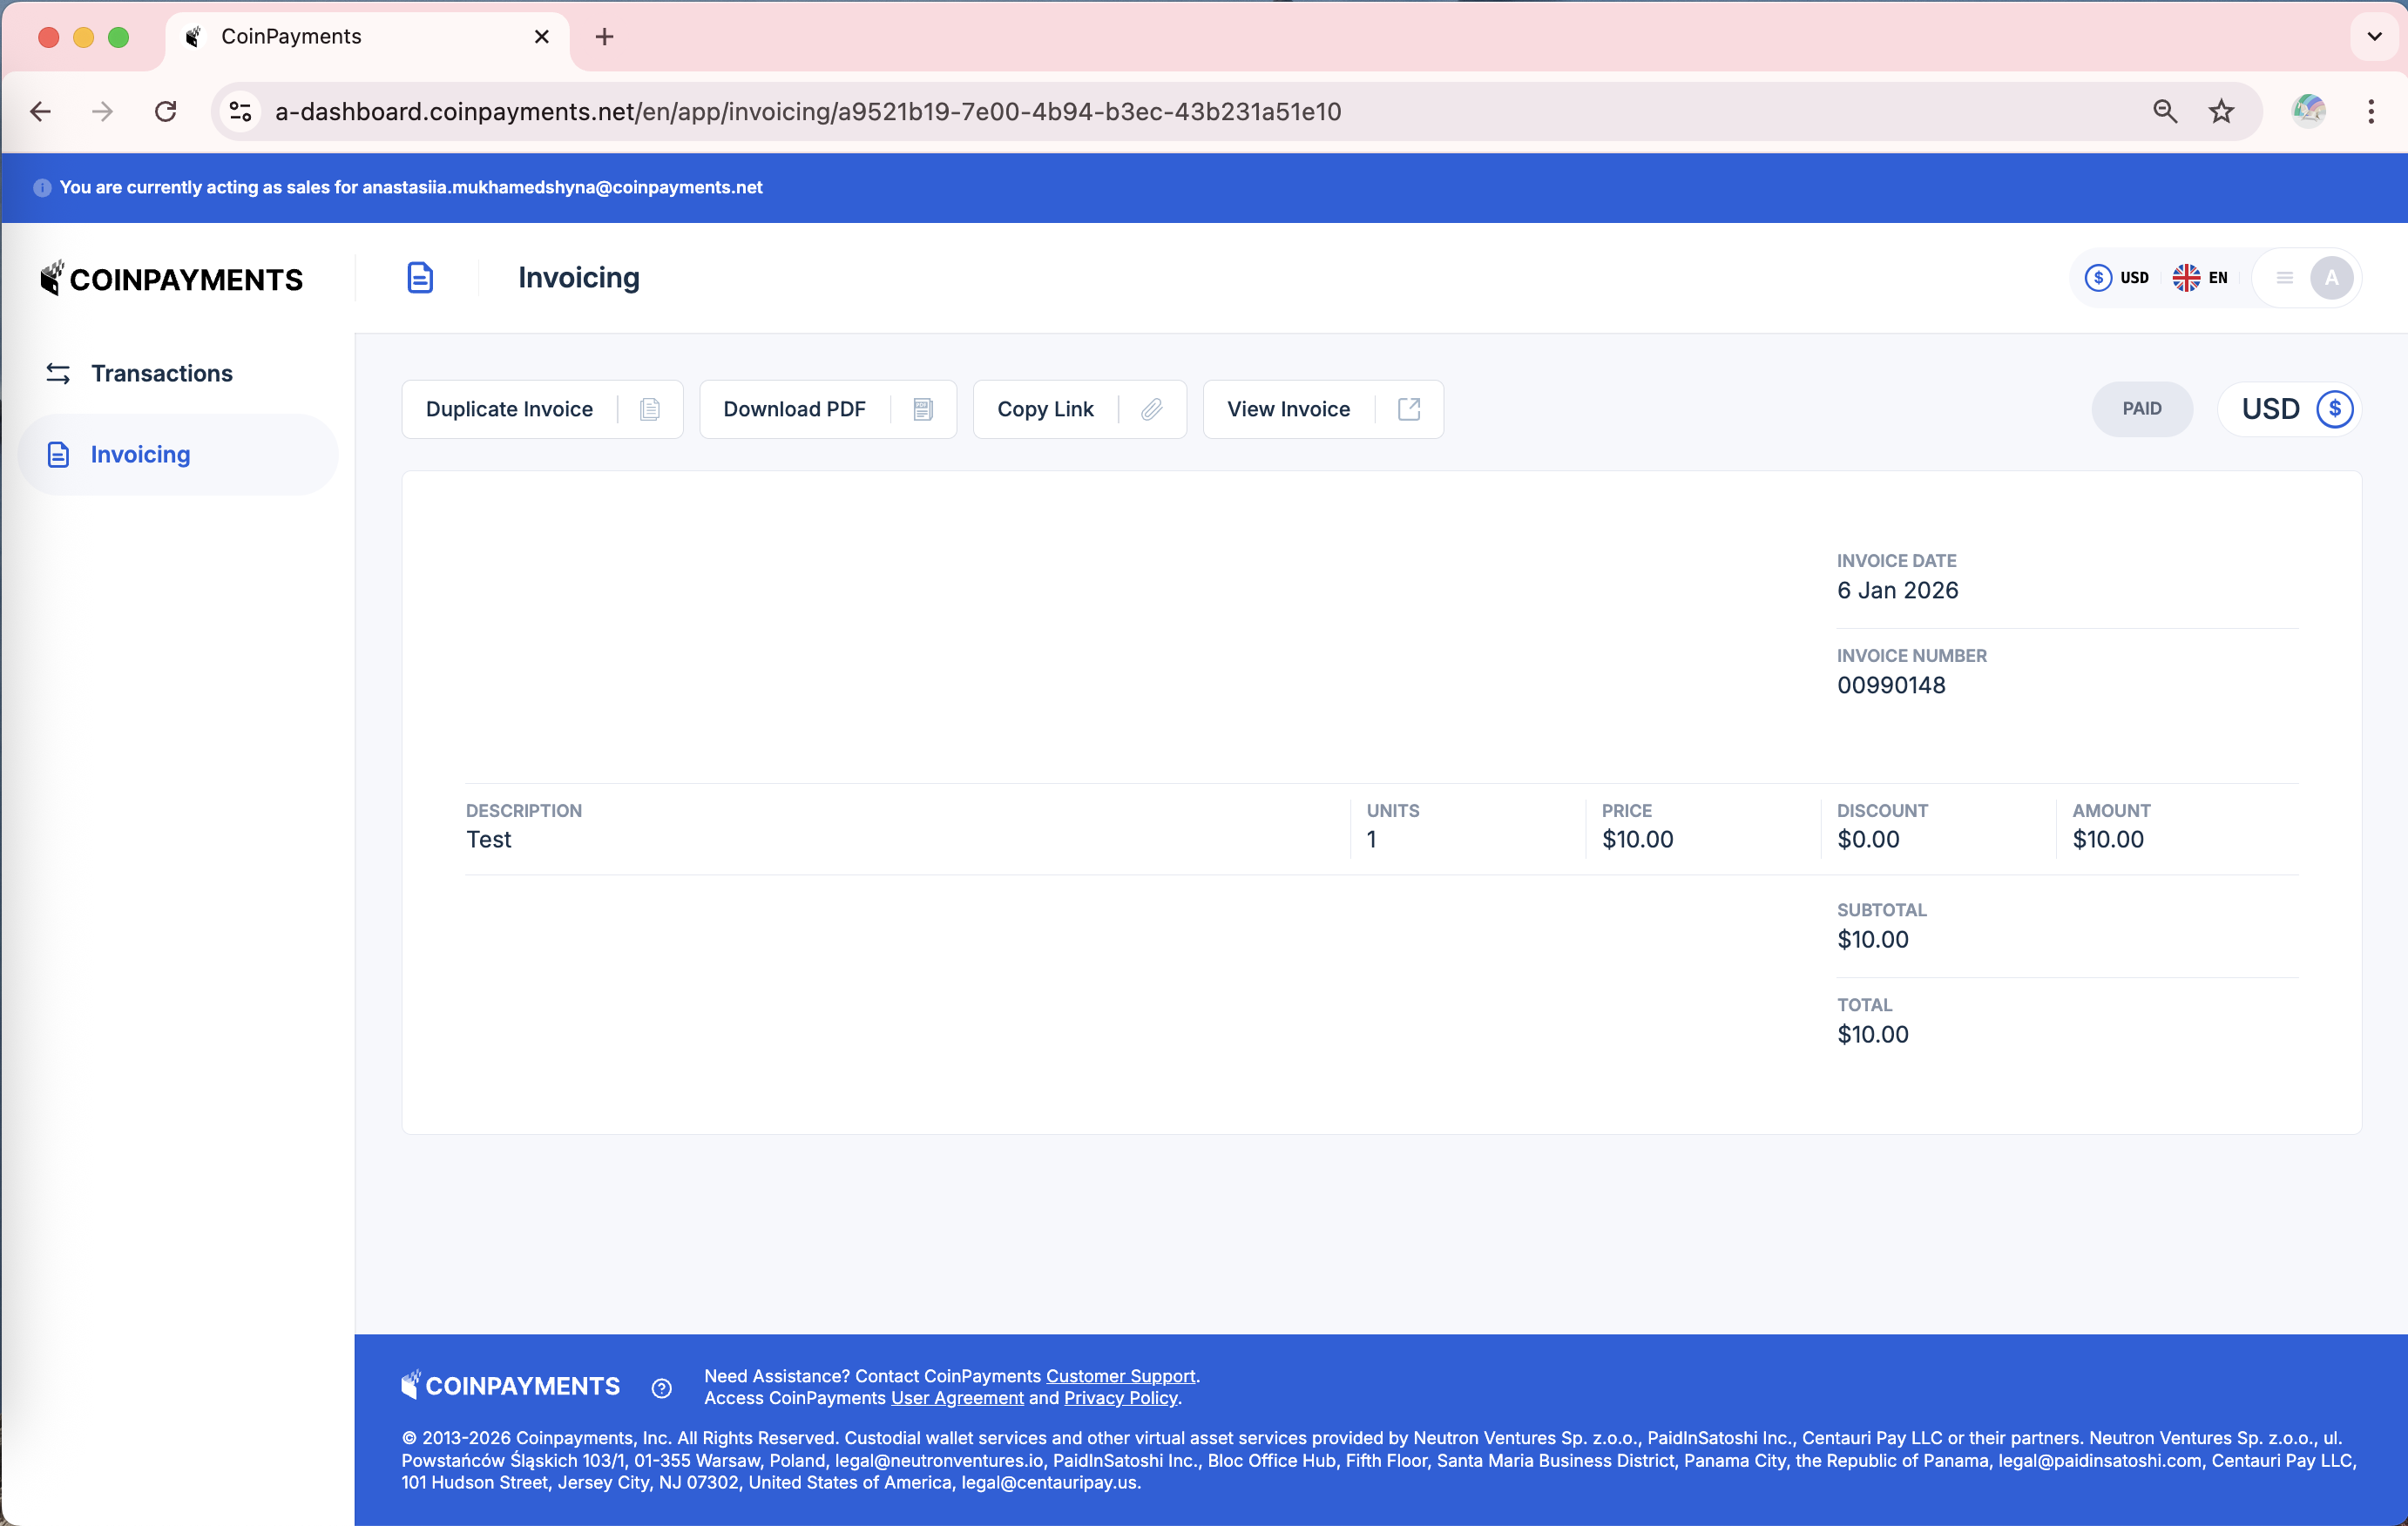
Scheduled payout invoices: Sales users can duplicate the invoice, download it, or copy its link for sharing.
What Sales Users Cannot Do
Sales users do not have permission to:
- View wallets, balances, or non-invoice transactions
- Export transaction data
- View or edit payment settings
- View or manage integrations and webhooks
- Invite or manage users
- Modify the organization's business profile
8. Removing Yourself From an Organization
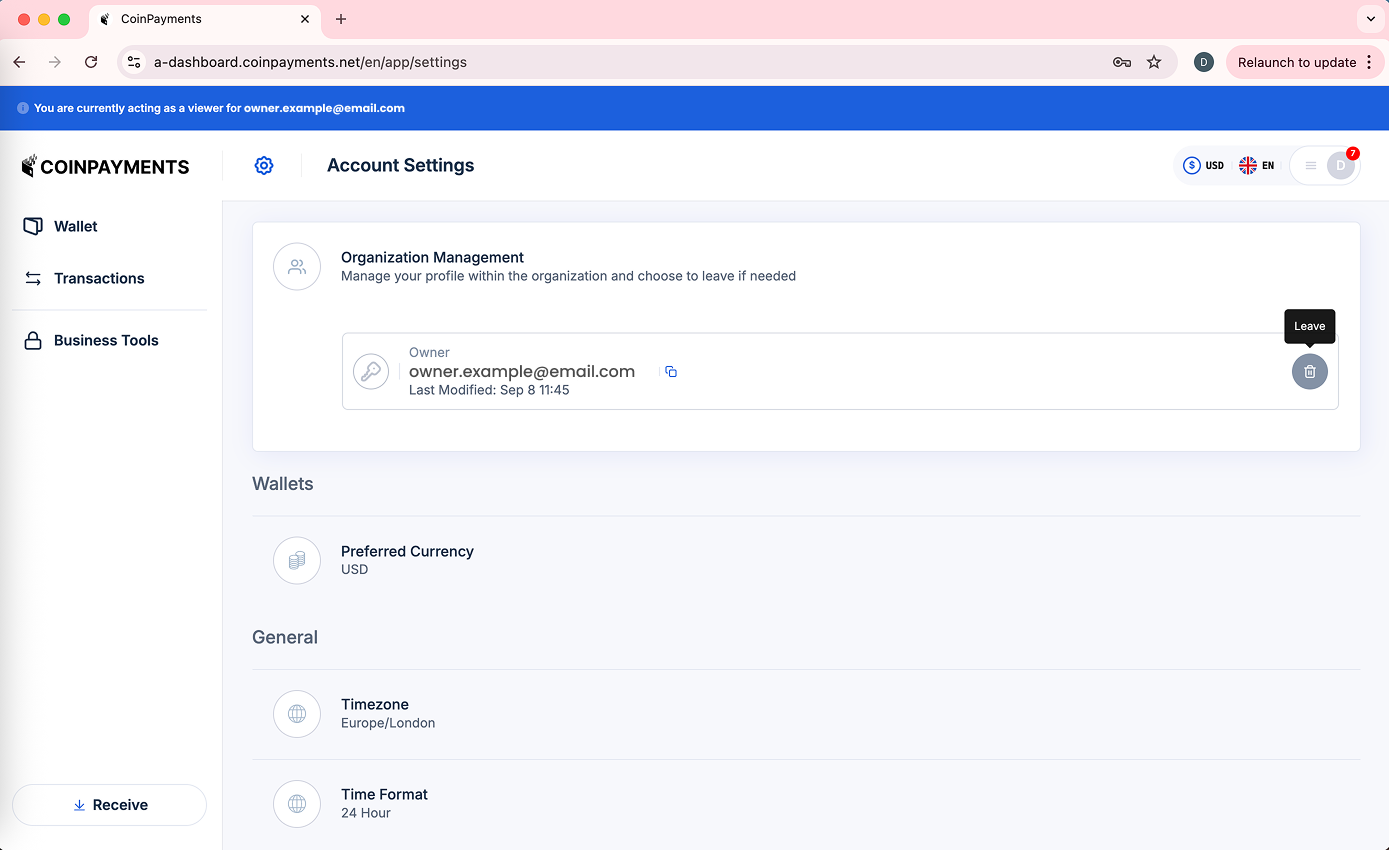
Viewer and Sales users can leave an organization at any time. Account Owners cannot remove themselves from their own organization - ownership must be transferred first or the organization must be deleted.
-
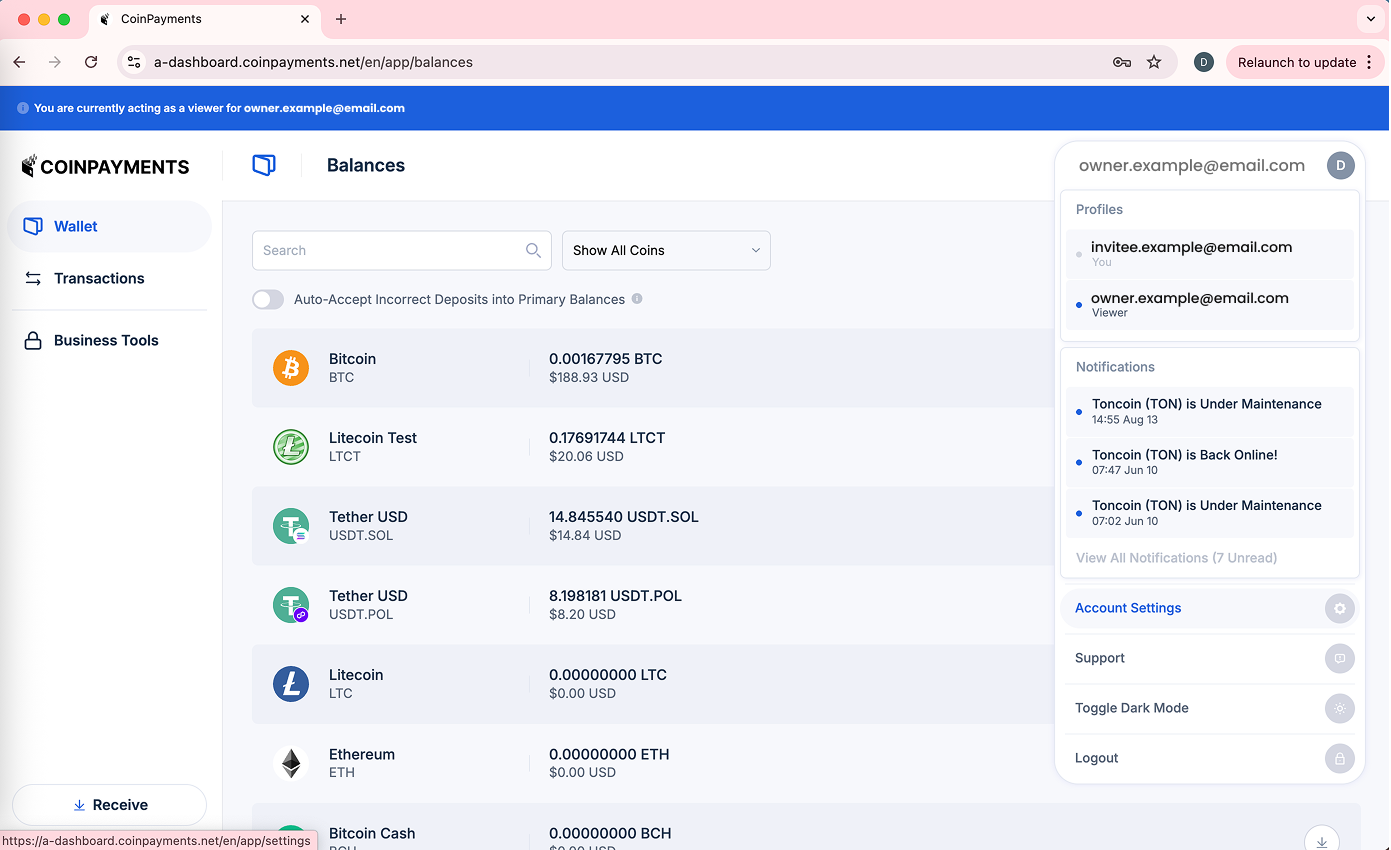
Go to Account Settings (by clicking the Profile Switcher on the top-right and selecting Account Settings)
-
Select Organization Management to expand the section.
-
Click the Leave button.
-
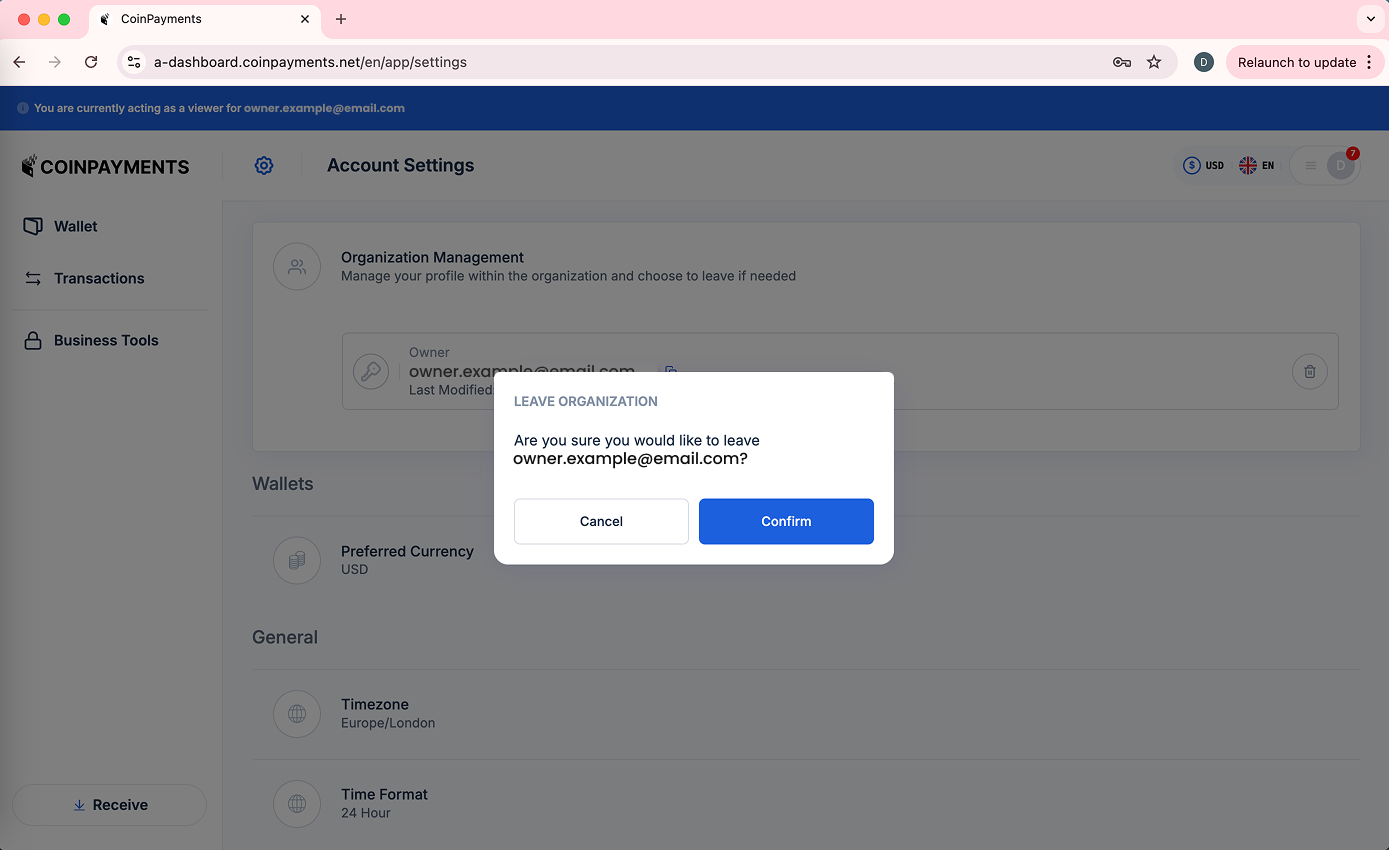
Click Confirm to leave the organization, or the Cancel button to abort.
-
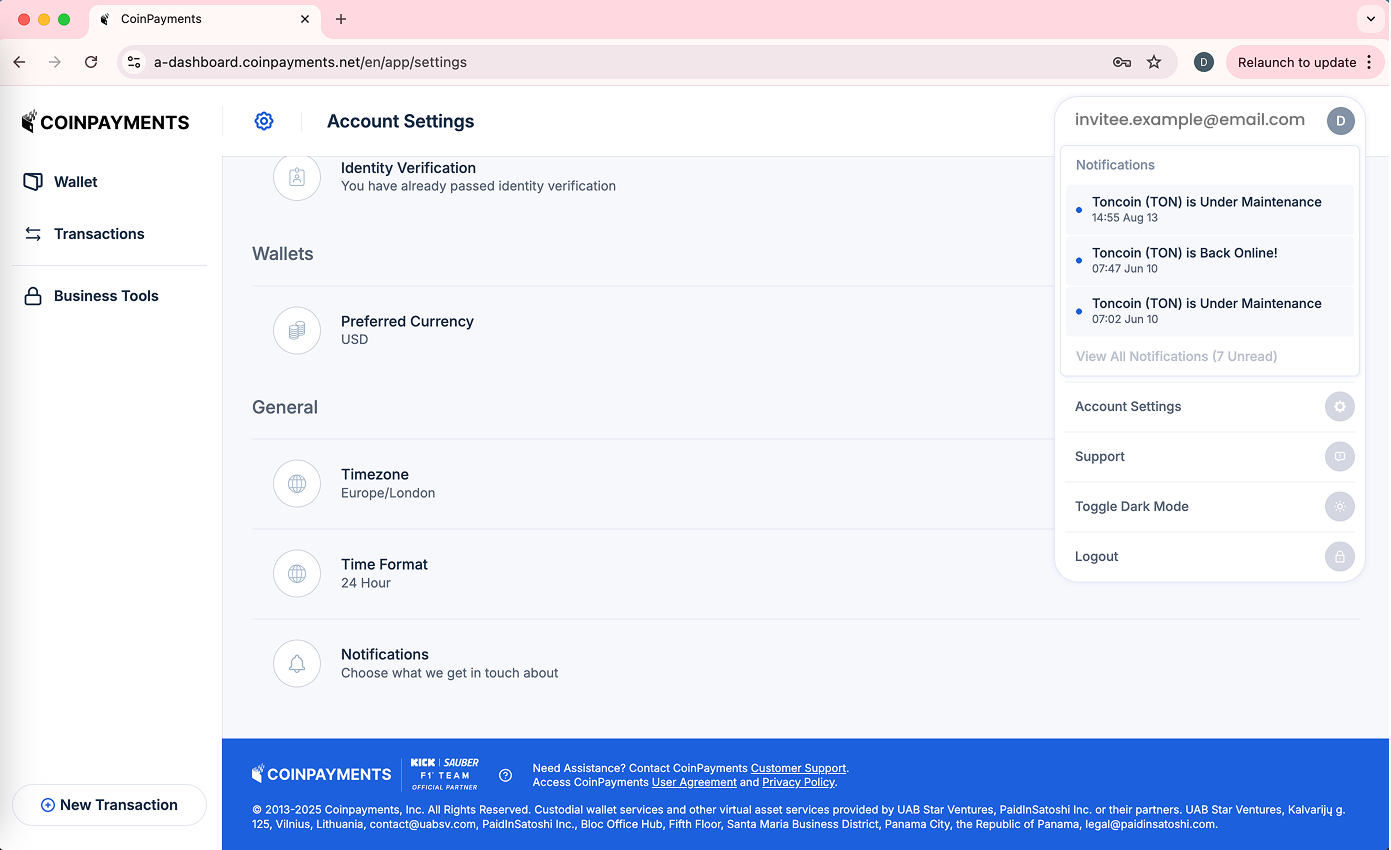
Once you confirm to leave the organization, you will no longer see it on your Profile Switcher list.
9. FAQs
Why can't CoinPayments merge entities? Regulations require EU and non-EU data and operations to remain separate.
Can I switch my existing account to another entity? No. You must create a new account using a different email address.
Success Factors for Adding Users
A user can join an organization if:
- The invited user's jurisdiction is supported by CoinPayments.
- The invited user signs up under the same entity as your organization.
Failure Factors for Adding Users
A user cannot join if:
- The invited user's jurisdiction is not supported by CoinPayments.
- The invited user's country is not supported for your entity type.
- The invited email already exists in the CoinPayments ecosystem.
Note: Account verification is not mandatory to join an organization or view its data.
10. Summary
The Multi-User feature gives you flexibility, control, and efficiency in managing your CoinPayments business account.
By assigning roles and understanding jurisdiction limitations, you can collaborate securely while staying compliant.